Unclog Clogged Spray Paint Cans: A Comprehensive Guide To Restoring Your Tools
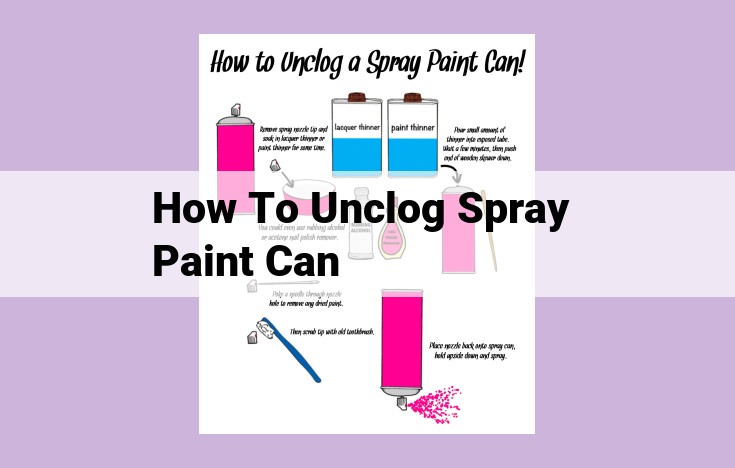
To unclog clogged spray paint cans, start by shaking them and identifying the type of blockage. Use a needle to unclog the nozzle or gently poke it with a screwdriver. Remove the nozzle for thorough cleaning using compressed air or acetone. If the clog is deep, let the can soak in acetone. For severe clogs, use a screwdriver to pry the can open. Always wear safety gear and work in a well-ventilated area. Test the can before use and dispose of clogged cans responsibly.
Unclogging Spray Paint Cans: A Step-by-Step Guide to Save Your Painting Projects
As an avid DIYer or professional painter, encountering a clogged spray paint can is an inevitable frustration. But don’t despair! Unclogging spray paint cans is a straightforward task that can save your time and project. With the right tools and safety precautions, you can restore your spray paint cans to perfect working order.
Materials Required
Before you begin, gather all the necessary materials:
- Needle (thin or sewing needle)
- Screwdriver
- Pliers
- Compressed air can
- Acetone or other solvent
- The clogged spray paint can
Safety Precautions
Spray paint contains hazardous chemicals, so it’s essential to prioritize safety:
- Wear gloves and safety glasses.
- Work in a well-ventilated area.
- Avoid prolonged skin contact with acetone or other solvents.
Pre-Unclogging Checks
Before attempting to unclog, perform these initial steps:
- Shake the can vigorously: This may dislodge minor blockages.
- Identify the clog type: Check if the clog is in the nozzle or can.
Unclogging Methods
Using a Needle:
– Insert a thin needle into the nozzle to break up dried paint.
– Caution: Do not force the needle, as you may damage the nozzle.
Poking the Nozzle:
– Use a screwdriver or pliers to gently pry open the nozzle.
– Be careful not to apply too much force, as this could damage the can.
Nozzle Removal and Cleaning:
– If necessary, unscrew the nozzle using pliers.
– Clean the nozzle thoroughly with compressed air or solvent.
Compressed Air Cleaning:
– Direct a compressed air stream into the nozzle or can to blow out debris.
– Tip: Hold the can upside down to prevent paint from spattering.
Solvent Soaking:
– Submerge the can’s nozzle or entire can in acetone for several hours.
– This will dissolve dried paint and other clogs.
Testing and Disposal
- Test the spray paint: Once unclogged, test the can on a scrap surface before using it on your project.
- Disposal: Dispose of clogged cans according to your local regulations. Never puncture or incinerate spray paint cans.
Unclogging Spray Paint Cans: A Step-by-Step Guide
Materials Required
Before embarking on your spray paint can unclogging adventure, gather these essential tools:
- Needles: Sharp and sturdy, they’re perfect for piercing through stubborn clogs.
- Screwdrivers: Versatile and indispensable, they can pry open nozzles and dislodge blockages.
- Pliers: Grip and manipulate parts with finesse, making them ideal for removing stubborn nozzles.
- Compressed air cans: Armed with a powerful blast, they’ll clear debris effortlessly.
- Acetone (or other solvent): A chemical warrior against paint clogs, it’ll dissolve paint residue with ease.
- The clogged spray paint can: Your patient awaiting your expert unclogging touch.
Safety Precautions: Prioritizing Well-being When Unclogging Spray Paint Cans
Unclogging spray paint cans can be a seemingly mundane task, but it’s crucial to remember the potential hazards involved. Safety should be your top priority to avoid any mishaps.
Protect Your Eyes and Skin:
Before embarking on your unclogging mission, don protective gear. Gloves shield your hands from chemicals, while safety glasses safeguard your eyes from flying paint particles.
Ventilate Your Workspace:
Spray paint fumes can be harmful, especially in confined spaces. Ensure adequate ventilation by opening windows or using a fan to keep the air circulating.
Handle Cans with Caution:
Spray paint cans are pressurized, so handle them with care. Avoid dropping them or exposing them to extreme temperatures, as this could cause them to rupture or explode.
Use Safe Tools:
When using tools like needles, screwdrivers, or pliers, always exercise caution. Wear gloves to prevent cuts or punctures, and be mindful of sharp edges.
Remember:
By following these safety precautions, you can tackle spray paint can unclogging with confidence and peace of mind. Remember, your well-being should always come first.
Pre-Unclogging Checks: Avoiding Wasted Effort
Before diving into unclogging techniques, it’s crucial to perform a few preliminary checks to diagnose the nature of the clog and avoid unnecessary efforts. These steps will help you pinpoint the root cause and increase your chances of successful unclogging.
1. Vigorous Shaking:
Before reaching for any tools, vigorously shake the can for several minutes. This helps redistribute paint pigments that may have settled and contributed to the clog. Ensure you shake it in multiple directions to ensure thorough mixing.
2. Nozzle Inspection:
Examine the nozzle for any **visible blockages. Look for dried paint residue, dirt, or debris that may be obstructing the paint flow. If you notice any obstructions, you may need to remove the nozzle for further cleaning.
3. Identifying the Clog Type:
Try to identify the type of clog you’re dealing with. Is it a light blockage that can be dislodged with a needle, or a stubborn blockage that requires more extensive measures? Knowing the clog’s severity will help you choose the appropriate unclogging method.
Unclogging Spray Paint Cans: A Step-by-Step Guide
Safety Precautions
When handling clogged spray paint cans, safety is paramount. Don protective gloves and safety glasses. Ensure you are working in a well-ventilated area to avoid inhaling harmful fumes.
Pre-Unclogging Checks
Before tackling the clog, shake the can vigorously to loosen any blockages. Determine the type of blockage—is it the nozzle tip or the valve stem? This will guide your unclogging method.
Unclogging Methods
1. Needle Unclogging
- Carefully insert a fine needle into the nozzle tip.
- Gently wiggle and twirl the needle to dislodge the blockage.
- Test spray the can to check if the clog is cleared.
2. Nozzle Poking
- Insert a wooden toothpick or thin wire into the nozzle tip.
- Use gentle poking motions to break up any dried paint or debris.
- Repeat until the paint sprays smoothly.
3. Screwdriver Prying
- Locate the valve stem on the bottom of the can.
- Carefully insert the tip of a small screwdriver into the valve.
- Gently pry the valve open to allow the paint to flow.
4. Nozzle Removal and Cleaning
If necessary, remove the nozzle by twisting it off the can. Use compressed air or a solvent to clean the nozzle and valve stem. Reattach the nozzle and test spray.
5. Compressed Air Cleaning
- Use a compressed air can to blast out any debris from the nozzle or can.
- Hold the can upside down and spray compressed air into the nozzle.
- Repeat until the paint flows freely.
6. Solvent Soaking
For stubborn clogs, soak the nozzle tip or valve stem in acetone or another solvent. Allow it to soak for several hours before testing the spray.
Nozzle Removal and Cleaning: Restoring Your Spray Paint’s Flow
When your spray paint can refuses to cooperate, it’s often due to a clogged nozzle. Unclogging it can seem daunting, but it’s a relatively straightforward process with the right approach. Let’s dive into the details of nozzle removal and cleaning.
1. Remove the Nozzle
-
Gently twist the nozzle counterclockwise to detach it from the can. Avoid using excessive force, as you may damage the threads.
-
If the nozzle is stuck, use a pair of pliers wrapped in a cloth to grip it securely. Apply gentle pressure and twist slowly.
2. Clean the Nozzle
-
Blast the nozzle with compressed air to dislodge any loose debris. Use a concentrated stream of air from a distance of a few inches.
-
If compressed air alone doesn’t suffice, soak the nozzle in acetone or a suitable solvent for a short period. This will dissolve paint buildup and other clogs.
-
After soaking, rinse the nozzle thoroughly with compressed air or solvent. Ensure all debris and residue are removed.
3. Reattach the Nozzle
-
Check the inside of the can for any remaining debris. Use a cotton swab or a toothpick to remove any obstructions.
-
Screw the nozzle back onto the can clockwise. Tighten it securely, but avoid overtightening.
4. Test the Spray
-
Before you resume painting, test the spray paint. Point the can away from yourself and press the trigger.
-
If the spray is clear and even, you’ve successfully unclogged the nozzle. If the clog persists, repeat the cleaning process or consider replacing the nozzle entirely.
Remember, safety should always be paramount when working with spray paint. Wear appropriate protective gear, work in a well-ventilated area, and follow the manufacturer’s instructions carefully. With these tips, you can restore your spray paint to its pristine condition and tackle your painting projects with ease.
Compressed Air Cleaning: A Powerful Tool for Unclogging Spray Paint Cans
The Importance of Unclogging Spray Paint Cans
Clogged spray paint cans are not just an inconvenience; they can also cause serious paint waste. When paint is unable to flow from the can, it can build up inside the nozzle, causing a mess and making the can difficult or even impossible to use.
Using Compressed Air to Clear Clogs
Compressed air is a powerful tool that can be used to clear clogs from spray paint cans. It works by blasting a jet of air into the nozzle, which helps to dislodge any paint that is blocking the passageway.
How to Use Compressed Air to Clean a Spray Paint Can
- Ensure the nozzle points in a safe direction while performing this process.
- Hold the can upright and insert the nozzle of the compressed air can into the nozzle of the spray paint can.
- Press the trigger on the compressed air can to release a blast of air into the spray paint can.
- Continue blasting air into the can until the clog is cleared.
Tips for Using Compressed Air Safely
Compressed air can be dangerous if not used properly. Always wear safety glasses when using compressed air. Keep the compressed air can away from your face and skin. Never point a compressed air can towards another person.
Compressed air is a safe and effective way to unclog spray paint cans. By following the steps outlined above, you can keep your spray paint cans clean and flowing smoothly.
Solvent Soaking: A Powerful Aid in Unclogging Spray Paint Cans
When other methods fail to restore the flow of your spray paint, solvent soaking emerges as a potent solution. This technique involves immersing the clogged spray paint can in a solvent, allowing it to penetrate and dissolve the blockage gently.
Choosing the Right Solvent
The choice of solvent is crucial. For most spray paint clogs, acetone is the recommended solvent due to its strong dissolving properties. However, it’s essential to check the specific paint’s compatibility with acetone before use.
Immersion Process
- Prepare a container: Fill a container deep enough to submerge the spray paint can.
- Add acetone: Pour acetone into the container until it covers the clogged part of the can.
- Immerse the can: Submerge the spray paint can in the acetone, ensuring the nozzle and clogged area are fully immersed.
- Soak overnight: Allow the can to soak overnight or for several hours, depending on the severity of the clog.
Cleaning and Testing
After soaking, remove the can from the acetone and clean the nozzle area thoroughly with a clean cloth or brush. Use compressed air to blow out any remaining solvent or debris. Allow the can to dry completely before testing it. To test the spray paint, hold the can upright and press the nozzle. If the paint flows smoothly, your unclogging efforts have been successful.
Safe Disposal
If the solvent soaking method does not resolve the clog, the spray paint can may need to be disposed of safely. Dispose of clogged spray paint cans in accordance with local regulations. Never puncture or incinerate spray paint cans, as this can be extremely dangerous.
Testing and Disposal
Before using the spray paint, it’s crucial to test its functionality. Aim at a scrap piece of material and press the nozzle. If the paint flows smoothly without sputtering, you’re good to go.
If you encounter any further issues, don’t throw away the can just yet. Spray paint contains volatile organic compounds (VOCs) that can harm the environment if disposed of improperly. Instead, contact your local waste management company or hazardous waste disposal facility for proper guidance. They’ll provide you with instructions on how to safely dispose of the clogged can and its contents.
Remember, disposal methods may vary depending on your location, so it’s essential to check with your local authorities for specific regulations. By following these guidelines, you can unclog your spray paint can effectively and dispose of it safely, ensuring a responsible approach to both your projects and the environment.
