Master The Art Of Spatchcocking: A Guide To Carving A Flavorful Turkey
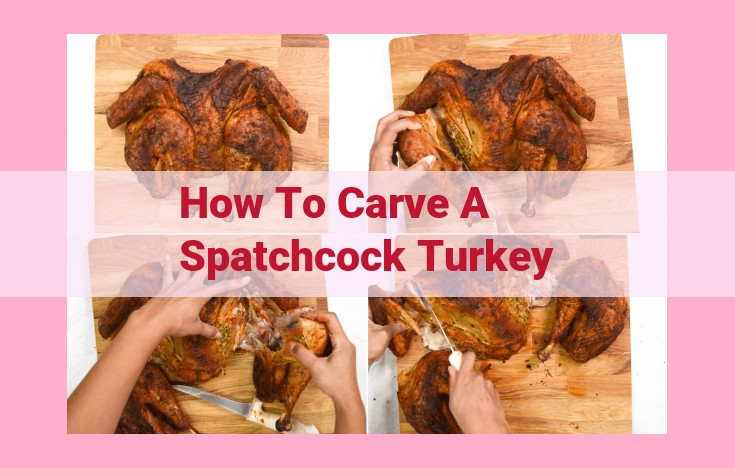
To carve a spatchcock turkey, remove the backbone and flatten the bird. Place it skin-side up on a roasting rack in a pan. Carve the breasts away from the breastbone, then slice the thighs and drumsticks. Cut against the grain to ensure tender meat.
The Art of Dry Brining: Enhancing the Flavor and Tenderness of Your Turkey
Introduction:
As the festive season approaches, the delectable aroma of roasted turkey fills the air. Dry brining is an essential technique that transforms your turkey into a culinary masterpiece, enhancing its flavor and tenderness to perfection.
What is Dry Brining?
Dry brining is a method of salting the turkey inside and out, allowing it to absorb the salt gradually over several hours or even days. Unlike traditional wet brining, dry brining does not require submerging the turkey in a liquid solution.
Benefits of Dry Brining:
* Enhanced Flavor: Salt penetrates deep into the turkey, infusing it with rich, savory notes throughout.
* Improved Tenderness: Salt helps break down proteins, resulting in a succulent, melt-in-your-mouth texture.
* Crispy Skin: The salt draws moisture from the surface of the turkey, allowing it to brown and crisp when roasted.
* Versatility: Dry brining can be done well in advance, making it a convenient time-saver.
How to Dry Brine Your Turkey:
1. Prepare the Turkey: Remove the giblets and neck from the turkey cavity.
2. Season Generously: Sprinkle salt liberally over the entire turkey, inside and out. Use about 1 teaspoon of salt per pound of turkey.
3. Refrigerate: Place the turkey in an uncovered roasting pan and refrigerate for 12-24 hours for a small turkey or 24-48 hours for a large turkey.
4. Roast as Usual: Remove the turkey from the refrigerator and roast according to your preferred recipe. Do not rinse the turkey before roasting.
Tips for Optimal Results:
* Use a high-quality salt, such as kosher salt or sea salt.
* Brine the turkey on a wire rack to allow air to circulate.
* Don’t be afraid to season the inside of the turkey as well.
* Don’t over-brine. Too much salt can make the turkey too salty.
Butterflying: Describe the technique of butterflying a turkey, its advantages, and step-by-step instructions.
Master the Art of Butterflying a Turkey: A Comprehensive Guide
The iconic Thanksgiving turkey takes center stage at the festive table, but what’s the secret to a succulent masterpiece? Butterflying is a culinary technique that transforms your roast into a juicy, evenly cooked marvel. Let’s dive in and unveil its advantages and the step-by-step process to butterfly a turkey like a pro.
Benefits of Butterflying
- Faster Cooking: Butterflying significantly reduces the cooking time by exposing more surface area to heat, ensuring your turkey cooks through and through without overcooking.
- Even Cooking: With the turkey evenly spread out, each part receives equal heat distribution, resulting in consistent doneness and a tender, flavorful dish.
- Enhanced Flavor Absorption: The exposed surface allows marinades, rubs, and seasonings to penetrate deeply into the turkey, resulting in a burst of delectable flavors.
- Easier Carving: The butterflied turkey lies flat on the roasting pan, making it effortless to carve into neat, uniform slices.
Step-by-Step Butterflying Instructions
1. Prepare the Turkey:
- Remove the turkey from the refrigerator and let it come to room temperature for about an hour. This allows the meat to relax, making it easier to butterfly.
- Remove the giblets and neck from the cavity.
2. Cut Along the Spine:
- Place the turkey breast-side up on a cutting board.
- Using a sharp knife or poultry shears, carefully cut along one side of the backbone.
- Repeat on the other side, removing the backbone completely.
3. Flatten the Turkey:
- Place the butterflied turkey on a large cutting board or roasting pan.
- Use the heel of your hand or a meat mallet to gently pound the turkey flat. This helps ensure even cooking and prevents curling.
4. Season and Roast:
- Season the butterflied turkey generously with your favorite seasonings and herbs.
- Place it on a roasting rack in a preheated oven and roast according to the recipe’s instructions.
By following these steps, you’ll butterfly your turkey with ease, unlocking its full flavor potential and creating a succulent centerpiece for your Thanksgiving feast.
Spatchcocking: The Secret to a Perfectly Roasted Turkey
Prepare Your Turkey for a Roasting Revolution
In the culinary world, roasting a turkey has long been a sacred tradition, but what if we told you there’s a method that not only elevates the flavor but also significantly shortens the cooking time? Enter spatchcocking—a technique that will transform your Thanksgiving or holiday feast.
What is Spatchcocking?
Spatchcocking, also known as butterflying, involves removing the turkey’s backbone and flattening it like a book. This allows heat to penetrate evenly, resulting in a succulent and evenly cooked bird.
Advantages of Spatchcocking
- Faster Roasting: Spatchcocking reduces cooking time by up to half compared to traditional roasting, giving you more time to enjoy with loved ones.
- Even Cooking: The flattened turkey ensures that all parts of the bird, from breast to thigh, cook at the same rate, eliminating dry or undercooked sections.
- Crispy Skin: The exposed skin of the spatchcocked turkey allows for maximum crisping, creating a tantalizing golden-brown crust.
- Easier Carving: Flattening the turkey makes carving a breeze, reducing the risk of messy or uneven slices.
How to Spatchcock a Turkey
- Remove the Backbone: Place the turkey on a cutting board, breast side up. Using a sharp knife or kitchen shears, cut along both sides of the backbone, starting from the neck to the tail. Remove the backbone and discard.
- Flatten the Turkey: Open the turkey like a book and press down firmly on the breastbone to flatten it.
- Season and Roast: Season the spatchcocked turkey generously with salt, pepper, and your favorite herbs and spices. Place it on a roasting rack in a prepared roasting pan and roast according to your preferred method.
The Essential Roasting Pan: A Culinary Canvas for Your Thanksgiving Turkey
The journey to creating the perfect roasted turkey begins with the humble yet indispensable roasting pan. This trusty vessel will cradle your bird, ensuring it roasts evenly and captures its succulent juices. When choosing a roasting pan, consider these key factors:
Size: The optimal size depends on the size of your turkey. A general rule of thumb is to choose a pan that is 1-2 inches larger than the turkey. This allows ample space for the bird to rest comfortably and for airflow to circulate.
Materials: Roasting pans come in a variety of materials, each with its own advantages. Stainless steel pans are durable and easy to clean, while aluminum pans distribute heat evenly. If you’re looking for a nonstick option, ceramic or enameled cast iron pans are excellent choices.
Additional Features: Some roasting pans come with built-in racks, which elevate the turkey and allow for better airflow. This helps prevent the turkey from sticking to the bottom of the pan and promotes even cooking. Lids and heat shields can also be useful to prevent splatters and regulate the heat distribution.
Choosing the right roasting pan is crucial for achieving a golden-brown, succulent turkey. It provides a stable foundation, promotes uniform cooking, and captures those precious juices that will form the basis of your delectable gravy. So, when you embark on your Thanksgiving culinary adventure, don’t overlook the significance of the humble roasting pan, a culinary canvas that will transform your turkey into a centerpiece of flavorsome delight.
Grilling Rack: An Essential Tool for Perfect Turkey Roasting
Preparing a succulent and flavorful roasted turkey is an art, and the right tools can elevate your culinary experience. One such indispensable tool is a grilling rack, a simple yet ingenious device that enhances the roasting process in numerous ways.
Benefits of Using a Grilling Rack
-
Enhanced Air Circulation: A grilling rack elevates the turkey above the bottom of the roasting pan, promoting even air circulation all around the bird. This ensures that every nook and cranny gets roasted to perfection, resulting in golden-brown skin and juicy meat.
-
Drippings Collection: The rack allows excess fats and juices to drip away from the turkey, preventing the bird from soaking in its own liquids. This results in crispier skin and prevents a soggy texture.
-
Ease of Cleaning: Unlike roasting directly in the pan, using a grilling rack makes cleanup a breeze. The excess fats and juices collect in the bottom of the pan, leaving you with minimal scrubbing and cleanup.
Choosing the Right Grilling Rack
Selecting the appropriate grilling rack is crucial for optimal performance. Consider the size of your turkey and the dimensions of your roasting pan. Ensure that the rack is large enough to accommodate the turkey comfortably but not so large that it prevents the juices from dripping down.
Positioning the Grilling Rack
Properly positioning the grilling rack is essential to maximize its benefits. Place the rack over the bottom of the roasting pan and insert the turkey onto the rack. The turkey should sit securely on the rack, avoiding any wobbling or uneven cooking.
By incorporating a grilling rack into your turkey roasting routine, you unlock a new level of culinary expertise. The enhanced air circulation, efficient dripping collection, and ease of cleaning will make your next roasted turkey the star of the show. So, grab a grilling rack, elevate your cooking, and savor the mouthwatering results!
Essential Carving Tools: The Key to Culinary Perfection
The art of carving a turkey is a culinary skill that requires not only technique but also the proper tools. Two indispensable instruments in a carver’s arsenal are the carving fork and the sharp carving knife. These tools work in tandem to effortlessly slice through the succulent meat, ensuring a clean and seamless presentation.
The carving fork, with its sturdy tines, serves as an anchor, firmly gripping the turkey in place while you wield the carving knife. Its sharp prongs pierce the skin and flesh with ease, providing you with the stability needed to execute precise cuts.
Equally important is the sharp carving knife. This specialized blade features a long, slender shape and a keen edge that glides through the turkey like a whisper. Its tapered point allows for intricate maneuvering, ensuring clean and even slices. A well-honed carving knife will effortlessly separate the meat from the bone, minimizing tearing and ensuring a visually appealing presentation.
Together, the carving fork and knife form an unstoppable duo, empowering you to expertly carve your turkey into perfect slices. These tools are not merely utensils; they are the keys to unlocking the full potential of your culinary creation, transforming a roasted turkey into a masterpiece of gastronomic art.
The Essential Guide to Mastering Thanksgiving Turkey
Preparing the perfect Thanksgiving turkey is an art form, and it all starts with understanding the anatomy of a turkey. This majestic bird has a unique structure that dictates how it should be carved for the most tender and flavorful results.
The turkey’s breast is the largest and most sought-after part. It is divided into two halves, which should be separated at the wishbone for easy removal. The thighs and drumsticks are located on either side of the breast and are best carved as a whole unit.
The wings are often overlooked but offer a delicious and moist morsel. They are attached to the breast at the shoulder joint and should be removed before carving the rest of the bird.
The neck is not typically eaten but can be used to make a flavorful broth. It is attached to the body by the neck joint.
Carving Tips:
- Use a sharp carving knife to slice through the turkey easily.
- Cut against the grain to prevent tough meat.
- Rest the turkey before carving to allow the juices to redistribute, resulting in a more tender result.
Cutting Against the Grain: Explain the technique of cutting against the grain and its impact on the texture of the turkey.
## Cutting Against the Grain: Enhancing the Tenderness of Your Turkey
The art of carving a turkey is not solely about slicing it into neat portions; it’s about extracting the maximum tenderness from every bite. And the secret lies in cutting against the grain.
What is the Grain?
Every muscle in an animal’s body has a particular grain, or direction in which the muscle fibers run. In turkey, the grain runs parallel to the bone. By cutting against the grain, you sever the fibers perpendicularly, creating tender and juicy slices.
The Science Behind It
When you cut against the grain, you reduce the resistance of the fibers to sawing through your knife. This allows for easier cutting and prevents the meat from being tough. Additionally, by breaking up the fibers, the juices can more readily escape and permeate the meat, resulting in a flavorful and succulent turkey.
How to Cut Against the Grain
- Identify the Grain: Hold the turkey breast-side up and feel for the direction of the muscle fibers. They will run either parallel to the length of the turkey or perpendicular to it.
- Position Your Knife: Place your knife at a 90-degree angle to the grain.
- Slice Thinly: Cut thin, even slices to minimize the resistance and ensure tender results.
The Impact on Texture
Cutting against the grain is the key to unlocking the full potential of your turkey’s tenderness. Ignoring this technique will result in stringy and chewy slices that detract from your holiday feast. By following these steps, you’ll be able to carve a turkey that is not only beautifully presented but also delightfully tender.
The Perfect Salt and Pepper Balance for a Moist and Flavorful Turkey
When it comes to roasting the perfect turkey, seasoning is everything. While some herbs and spices might get all the glory, the humble duo of salt and pepper plays a crucial role in elevating your bird’s flavor and ensuring its moistness.
Salt, a natural flavor enhancer, helps the turkey juices hold onto more moisture during the roasting process. It also penetrates the meat, drawing out its natural flavors and seasonings. Pepper, on the other hand, adds a hint of spice and warmth to the turkey, balancing the saltiness and enhancing the overall taste.
How Much Salt and Pepper Should You Use?
The key to seasoning your turkey with salt and pepper is finding the right balance. Too much can overpower the meat, while too little will leave it bland and tasteless. A good rule of thumb is to use about 1 tablespoon of salt and 1 teaspoon of pepper for every 5 pounds of turkey.
Applying the Seasoning
Once you have your measurements, it’s time to apply the seasoning. Start by patting the turkey dry with paper towels. This will help the seasoning stick better. Then, sprinkle the salt and pepper evenly over the entire surface of the turkey, including the cavity. Be sure to get under the skin and season the meat between the breast and thighs.
Seasoning the Inside
Don’t forget to season the inside of the turkey as well. This will help ensure that the meat is moist and flavorful throughout. Sprinkle some salt and pepper into the cavity and stuff it with your favorite herbs and vegetables, such as onions, celery, and garlic.
Resting the Turkey
After roasting the turkey, one of the most important steps is to let it rest. This allows the juices to redistribute throughout the meat, resulting in a more tender and juicy bird. Let the turkey rest for at least 30 minutes before carving.
By following these tips, you can achieve the perfect balance of salt and pepper for your roasted turkey. This simple seasoning will enhance the natural flavors of the meat and create a moist and flavorful dish that will impress your guests.
Butter: Discuss the role of butter in keeping the turkey moist and flavorful, and explain different ways to incorporate it.
The Magical Touch of Butter: Keeping Your Turkey Moist and Flavorful
In the symphony of Thanksgiving flavors, the golden notes of butter reign supreme. This culinary maestro plays a pivotal role in orchestrating a succulent, delectable turkey that will leave your taste buds in harmonious bliss.
Butter’s rich texture and delicate flavor gently envelop the turkey, sealing in its natural juices. Like a master sculptor, it transforms the bird’s skin into a masterpiece of crisp perfection. Whether slathered underneath, injected directly, or basted throughout, butter’s versatility knows no bounds.
Slathering the Turkey: A Culinary Canvas
Prepare your canvas by spreading a generous layer of softened butter under the turkey’s skin. This secret technique ensures that every bite is kissed with butter’s golden embrace. As the turkey roasts, the butter melts and seeps into the meat, infusing it with irresistible flavor and tenderness.
Direct Injection: A Flavorful Epiphany
Elevate your turkey’s flavor profile to new heights with direct butter injection. Using a large needle, carefully inject melted butter into the turkey’s breast, thighs, and wings. This culinary acupuncture delivers a burst of moisture and flavor that will melt in your mouth.
Basting: The Maestro’s Touch
Throughout the roasting process, baste the turkey with a mixture of melted butter and your favorite herbs and spices. This loving act not only keeps the turkey moist but also enhances its golden hue. As the juices trickle down, they create a flavorful glaze that will tantalize your senses.
With butter’s magical touch, your Thanksgiving turkey will be a showstopper, embodying the spirit of the season: warmth, joy, and the irresistible allure of home. So gather your family, embrace the tradition, and let the golden notes of butter serenade your taste buds with a symphony of flavors that will create memories to cherish.
Herbs and Spices: Elevating the Flavor of Your Thanksgiving Turkey
As we approach the festive season of Thanksgiving, preparing a succulent and flavorful turkey is paramount. Seasoning plays a pivotal role in achieving that perfect taste, and herbs and spices are our culinary allies. Let’s explore a tantalizing repertoire of classic and innovative herbs and spices that will transform your turkey from ordinary to extraordinary.
Classic Herbs and Spices:
- Sage: The aromatic notes of sage are synonymous with Thanksgiving. Its earthy, peppery flavor complements the savory flavors of turkey beautifully.
- Thyme: Another versatile herb, thyme imparts a mild, slightly minty flavor that enhances the natural taste of the bird.
- Rosemary: With its pungent aroma and slightly bitter taste, rosemary adds a touch of elegance to your turkey. Use it sparingly to avoid overpowering the other flavors.
Innovative Herbs and Spices:
- Coriander: The citrusy notes of coriander bring a refreshing twist to the classic Thanksgiving flavors. Its warm, nutty flavor pairs well with both light and dark meat.
- Paprika: A vibrant spice, paprika adds a smoky and slightly sweet flavor. Use smoked paprika for an extra layer of depth.
- Star Anise: This unique spice has a licorice-like flavor that adds an unexpected but delightful element to your turkey.
Tips for Using Herbs and Spices:
- Fresh vs. Dried: Fresh herbs generally have a more intense flavor than dried ones, so use less if opting for fresh.
- Whole vs. Ground: Whole spices retain their aroma better than ground spices. Grind them yourself just before using for maximum flavor.
- Don’t Overcrowd: Use herbs and spices in moderation to avoid overwhelming the natural flavors of the turkey. Start with a small amount and adjust to your taste.
- Mix and Match: Experiment with different combinations of herbs and spices to create your own signature blend.
By incorporating these herbs and spices into your Thanksgiving turkey, you’ll elevate its flavor to unforgettable heights. Let the aroma of roasted turkey fill your home with joy and create memories that will last a lifetime.
The Art of Preserving Juiciness: Techniques for the Perfect Turkey
When it comes to roasting a turkey, maintaining its succulent tenderness is paramount. From basting to adding moisture to the pan, discover the culinary secrets that will transform your holiday feast into an unforgettable culinary masterpiece.
Basting: The Elixir for Tenderness
Throughout the roasting process, basting the turkey with its own juices nourishes it, creating a self-moisturizing effect. Using a spoon or turkey baster, gently baste the bird every 30-45 minutes, allowing the flavorful juices to penetrate and keep the meat from drying out.
Enriching the Pan: A Reservoir of Moisture
Don’t underestimate the power of your roasting pan in preserving juiciness. Adding moisture to the bottom of the pan creates a humid environment that prevents the turkey from becoming desiccated. Pour a cup of broth or water into the pan, and as the turkey roasts, these liquids will evaporate and create a protective layer of moisture.
Foil Protection: Shielding Delicacy
Strategic use of aluminum foil can also be your ally in the quest for a succulent turkey. During the initial roasting phase, leave the turkey uncovered to allow the skin to crisp. As the meat begins to cook, cover the breast loosely with foil to prevent it from overcooking and drying out. This technique ensures that the entire turkey cooks evenly while preserving its tender interior.
The Key to a Perfectly Juicy Turkey: Resting
In the culinary world, the phrase “rest before carving” holds immense significance, especially when it comes to the centerpiece of a special occasion meal—the roast turkey. Often overlooked or underestimated, this crucial step can elevate your holiday feast to new heights of tenderness and flavor. Let’s delve into why resting is essential and how it transforms your turkey from ordinary to extraordinary.
The Science Behind Resting
As your turkey roasts, its internal temperature rises, causing the muscle fibers to contract and the juices to squeeze out. By allowing the turkey to rest after cooking, you give these juices time to redistribute throughout the meat. This process ensures that each succulent bite is infused with its own flavorful elixir.
The Importance of Resting Time
The optimal resting time depends on the size of your turkey. As a general rule of thumb, allot 30 minutes for every 10 pounds. For a typical 12-14 pound turkey, a 60-70 minute rest is ideal. During this time, the turkey will continue to cook gently by residual heat, reaching an internal temperature of 165°F.
How to Rest a Turkey
To ensure proper resting, remove the turkey from the oven and tent it loosely with aluminum foil. This allows air to circulate while still trapping in moisture. Place the turkey on a cooling rack or baking sheet to prevent it from sitting in its own juices.
The Result: A Tender and Flavorful Feast
By resting the turkey, you create a succulent and juicy masterpiece. The juices have had ample time to permeate the meat, delivering a delectable flavor in every bite. The meat will also be more tender, as the muscle fibers have had time to relax and become more pliable.
Resting your turkey is a simple yet profoundly beneficial step in the roasting process. By taking this extra time, you ensure that your holiday centerpiece is not only cooked to perfection but also bursts with flavor and tenderness. So, this Thanksgiving, don’t skip this crucial step. Let your turkey rest, and let the flavors sing in every bite.
Thanksgiving Traditions: Explore the history and significance of Thanksgiving traditions, such as gathering with family, sharing gratitude, and enjoying a festive meal.
The Heartwarming Traditions of Thanksgiving
Gatherings and Gratitude
Thanksgiving is a time for gathering with loved ones, sharing laughter, and expressing gratitude for the blessings in our lives. The tradition of gathering with family and friends dates back to the first Thanksgiving in 1621, when the Pilgrims shared a feast with the Wampanoag Indians to celebrate the harvest. Today, we continue this tradition by gathering around the dinner table, sharing stories, and giving thanks for the people and things that make our lives rich.
Festive Delights
The Thanksgiving meal is a central part of the holiday, with its iconic dishes such as turkey, stuffing, mashed potatoes, and pumpkin pie. Preparing and sharing this festive spread brings families and communities together. The aroma of roasting turkey, the warmth of mashed potatoes, and the sweetness of pumpkin pie create a sensory experience that evokes nostalgia and joy.
Historical Significance
Thanksgiving has a long and rich history that is intertwined with the founding of the United States. It was first proclaimed a national holiday by President Abraham Lincoln in 1863, during the Civil War. Lincoln hoped that the holiday would help to heal the nation’s wounds and foster a sense of unity. Today, Thanksgiving serves as a reminder of the sacrifices made by our ancestors and the values that have shaped our country.
Contemporary Celebrations
Over the centuries, Thanksgiving traditions have evolved to include a variety of activities, such as parades, football games, and community service. While the core elements of family gatherings and giving thanks remain, modern-day celebrations reflect the changing lifestyles and perspectives of our society.
Embracing the Tradition
Thanksgiving is a cherished holiday that brings people together and celebrates the spirit of gratitude. Whether you choose to gather with loved ones, volunteer in your community, or simply reflect on the blessings in your life, embrace the heartwarming traditions of Thanksgiving and create memories that will last a lifetime.
The Art of Perfecting the Thanksgiving Feast: A Culinary Journey
Gather your loved ones, for the enchanting aroma of roasted turkey and the warmth of tradition await. As we embark on the culinary adventure of preparing the perfect Thanksgiving meal, let us unravel the secrets of roasting a delectable turkey, carving it like a pro, and creating an unforgettable holiday experience.
Preparation: The Foundation of Success
Dry Brining: Transform your turkey into a masterpiece with the magic of dry brining. This simple yet effective technique draws out moisture, enhancing flavor and ensuring a juicy, tender interior. Sprinkle your bird liberally with salt and allow it to rest, creating a symphony of taste.
Butterflying and Spatchcocking: Culinary Innovations
Embrace the art of butterflying, where the turkey is split open like a book, allowing for even cooking and succulent results. Or, try the revolutionary technique of spatchcocking, where the backbone is removed and the turkey is flattened. Say goodbye to dry breast meat and hello to a golden-brown wonder.
Equipment: Your Culinary Companions
Roasting Pan: The Stage for Perfection
Select a sturdy roasting pan that provides ample space for your majestic turkey. Choose high-quality materials like stainless steel or cast iron for even heat distribution and durability.
Grilling Rack: The Elevation of Flavor
Elevate your turkey from the pan’s juices with a grilling rack. This ingenious invention ensures a crisp, evenly browned exterior while promoting optimal airflow for a flavorful feast.
Carving: A Symphony of Precision
Essential Tools: The Surgeon’s Kit
Sharpen your carving knife and secure your carving fork – the weapons of a culinary artist. With steady hands, embrace the anatomy of your turkey, carefully separating the delicate meat from the bones for masterful presentation.
Cutting Against the Grain: The Secret to Tenderness
Unlock the secret of tender, melt-in-your-mouth turkey by slicing against the grain. This technique severs muscle fibers, creating a more pleasing texture that will leave your guests savoring every bite.
Flavoring and Seasoning: The Symphony of Spices
Salt and Pepper: The Pillars of Taste
Season your turkey generously with salt and pepper, the foundational flavors that amplify the natural essence of the meat. Sprinkle liberally, allowing the seasonings to penetrate and enhance every morsel.
Butter: The Golden Embrace
Indulge in the luscious embrace of butter, the culinary gold that imparts richness and moisture to the turkey. Spread it beneath the skin or brush it on the exterior for a golden-brown masterpiece.
Herbs and Spices: The Tapestry of Aromas
Unleash your culinary creativity with a tapestry of herbs and spices. Sage, thyme, rosemary, and garlic conspire to create an enchanting symphony of flavors that will awaken your senses.
Maintaining Juiciness: The Quest for Perfection
Basting: The Elixir of Flavor
Regularly anoint your turkey with its own succulent juices, infusing it with moisture and enhancing the development of its rich flavors.
Moisture: The Source of Tenderness
Add moisture to the roasting pan by pouring in water, stock, or white wine. This creates a humid environment that prevents your turkey from drying out.
Covering: The Cradle of Comfort
Allow your turkey to rest under a warm tent of foil, allowing the juices to redistribute evenly for a tender, flavorful masterpiece. Embrace the patience, for it is the path to perfection.
Holiday Traditions and Entertaining: The Spirit of Thanksgiving
Thanksgiving Traditions: A Tapestry of Gratitude
Gather your family and friends around the table, honoring the traditions that have woven the tapestry of Thanksgiving. Share stories, express gratitude, and savor the warmth of togetherness.
Holiday Entertaining: The Culinary Dance
Prepare a festive spread that delights your guests from appetizer to dessert. Choose dishes that complement the star of the show – your perfectly roasted turkey. Create an inviting ambiance with festive decorations and a welcoming atmosphere. Let the spirit of the season fill your home and hearts.
