Expert Guide To Hassle-Free Screen Door Removal And Replacement
To remove a screen door, gather tools like a screwdriver, pliers, and staple gun. Lift the door off its hinges and detach any hardware holding it in place. Replace the old screen by removing it, stretching and stapling a new one in its place, then securing it. Reinstall the door by reconnecting it to the hinges, aligning it properly, and fastening it. Wear protective gear for safety. Regularly clean and inspect the door to maintain its functionality.
The Essential Guide to Screen Door Repair and Maintenance
Screen doors play a crucial role in our homes, providing ventilation, keeping the bugs out, and adding a touch of charm to our outdoor spaces. However, the wear and tear of everyday use can take a toll on these hardworking protectors. This comprehensive guide will guide you through the essential steps of repairing and maintaining your screen door, empowering you to restore its functionality and extend its lifespan.
Importance of Maintaining Screen Doors
Neglecting your screen door can have several adverse consequences. Torn or damaged screens allow insects and debris to enter your home, compromising your indoor air quality and comfort. Additionally, weakened frames and hinges pose safety hazards, potentially leading to accidents or injuries. By investing time in maintaining your screen door, you safeguard your family’s health, enhance home security, and ensure a pleasant and protected living environment.
Essential Tools and Materials for Screen Door Repair
Embarking on a screen door repair journey requires the right tools and materials to ensure success. Without the proper equipment, you may find yourself stuck, frustrated, or even causing further damage. So, let’s gather the essential resources that will help you restore your screen door to its former glory.
Measuring Tape and Pencil:
First, we need to know the exact dimensions of the new screen. A flexible measuring tape will allow you to accurately measure the width and height of the door frame. Use a pencil to mark the measurements on the new screen material.
Screen Replacement Kit:
This kit should include a roll of screen mesh, a spline roller, and enough spline material to secure the new screen. The mesh can be made of various materials, such as fiberglass, aluminum, or pet resistant, so choose the one that best suits your needs. The spline roller and spline will help you stretch and secure the mesh onto the frame.
Screwdrivers:
You’ll need a set of screwdrivers, including Phillips and flathead, to remove the screen door from its hinges and unscrew any damaged parts. Choose screwdrivers that fit snugly into the screw heads to avoid stripping.
Ladder (Optional):
If your screen door is located high on a wall or has a difficult-to-reach latch, you may need a ladder for safe access. Use caution when working at heights and always have someone hold the bottom of the ladder for stability.
Hammer or Staple Gun:
A hammer can be used to tap in staples to secure the screen, while a staple gun makes the process faster and easier. However, if you choose to use a staple gun, ensure the staples are long enough to penetrate the frame but not too long that they damage the opposite side.
Utility Knife:
A sharp utility knife will help you cut the mesh to the desired size and trim any excess material. Handle it with care and always cut away from your body.
Protective Gear:
Safety first! Wear gloves and safety glasses to protect your hands and eyes from splinters, sharp staples, or flying particles.
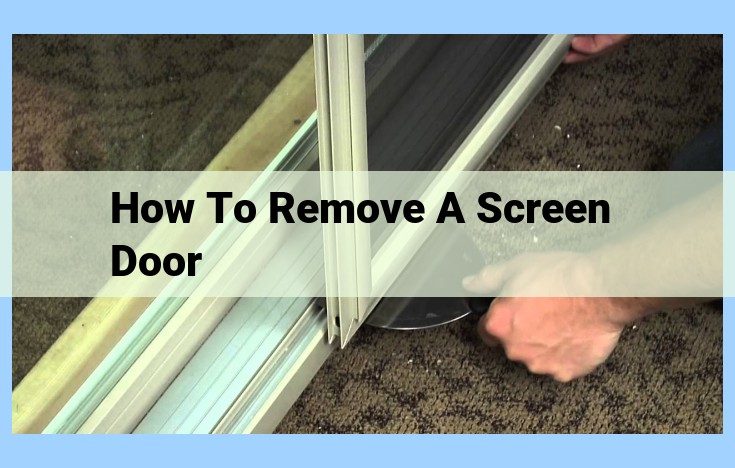
Removing the Screen Door: A Step-by-Step Guide
When it comes to home repairs, tackling screen door issues can be a breeze with the right approach. Before you begin, gather your essential tools and materials, including a screwdriver, pliers, safety glasses, and gloves. Once you’re geared up, follow these step-by-step instructions to safely remove your screen door and prepare it for repairs.
Step 1: Locate the Hinges
Identify the hinges that connect the screen door to your home’s frame. Typically, there are two hinges, one at the top and one at the bottom.
Step 2: Remove the Top Hinge Pin
Using a screwdriver, carefully lift the door slightly to expose the top hinge pin. Pull the pin straight out of the hinge. If it’s stubborn, gently tap it with a hammer.
Step 3: Support the Door and Remove the Bottom Hinge Pin
With one hand supporting the screen door, lift it slightly to access the bottom hinge pin. Pull the pin out similarly to the top one.
Step 4: Disconnect the Door
Once both hinge pins are removed, carefully lift the screen door straight up to disengage it from the frame. Keep a firm grip and be cautious not to damage the screen or frame.
Step 5: Remove Securing Hardware (Optional)
In some cases, screen doors may have additional securing hardware, such as latches or bolts. Locate and remove any such hardware using the appropriate tools.
Now that you’ve successfully removed the screen door, you’re ready to proceed to the next step of your repair process. Remember, safety first! Always wear protective gear and handle tools with care.
Replacing the Screen
- How to remove the old screen, stretch and staple the new screen onto the frame, and secure it in place.
Replacing the Screen: A Step-by-Step Guide
In the realm of home maintenance, there are few tasks as straightforward and satisfying as replacing a screen door. Whether your trusty guardian has fallen victim to weather damage, playful pets, or simply the passage of time, this guide will empower you to restore its pristine glory in a few simple steps.
Removing the Old Screen
With the screen door safely removed from its hinges, it’s time to bid farewell to the old, tattered screen. Using a flathead screwdriver or a screen removal tool, carefully pry up the spline that holds the screen in place. As you work your way around the frame, gently pull the old screen loose, taking care not to tear or damage the frame itself.
Stretching and Stapling the New Screen
Now, the moment has come to give your screen door a fresh start. Place the new screen on a flat surface, aligning it with the frame. Carefully stretch the screen over the frame, smoothing out any wrinkles or creases. Using a staple gun, begin stapling the screen to the frame, starting at the center and working your way outward. Ensure that the staples are evenly spaced and tightly secured.
Securing the Screen in Place
Once the entire screen is stapled, it’s time to give it a final touch of security. Using the spline tool, insert the spline back into the channel around the frame. Gently tap the spline into place with a hammer or a rubber mallet, ensuring that it fits snugly around the screen and frame. This will hold the screen firmly in place and prevent it from sagging or becoming loose.
With the new screen securely installed, you’ve successfully rejuvenated your screen door, giving it a new lease on life. Regular cleaning and maintenance are all that remain to keep it in tip-top shape for years to come. Remember to periodically check the screen for any tears or damage and address them promptly to prevent further issues. And if you find yourself in need of a replacement screen again in the future, don’t hesitate to refer to this guide once more.
Reinstalling the Screen Door
Now that you have replaced the screen, it’s time to put the door back in its rightful place. Carefully lift the screen door back onto its hinges, ensuring that it aligns with the frame.
Secure the door with the appropriate hardware, such as screws or bolts. Tighten them until the door is firmly in place. Double-check the alignment and ensure that the door opens and closes smoothly without any binding or rubbing.
Remember, a properly reinstalled screen door will not only enhance the beauty and functionality of your home but also provide protection from insects and other uninvited guests.
Safety Precautions: A Must for Screen Door Repair
Protect Your Peepers:
When tackling screen door repairs, safety glasses are your trusty companions. Protect your precious eyes from pesky staples or flying debris that may attempt to invade your personal space. They’re like tiny shields for your vision, ensuring you can see clearly throughout the repair journey.
Glove Up for Grip and Grace:
Don’t let rough edges or sharp staples mar your delicate hands! Gloves are your trusty sidekicks, providing a sturdy grip and safeguarding your skin from potential cuts and scrapes. With gloves on, you’ll confidently handle sharp tools and coarse materials without a hitch.
Exceptional Ventilation for Easy Breathing:
Working with certain materials during screen door repair can release fumes that aren’t exactly your best friends. Adequate ventilation is your knight in shining armor, ensuring a healthy and breathable workspace. Open those windows, fan those doors, and let fresh air circulate to keep your lungs feeling happy and content.
Additional Tips and Maintenance
To ensure your screen door remains in pristine condition for years to come, consider these additional tips:
-
Regular Cleaning: Sweep or vacuum your screen door regularly to remove dirt and debris. For a deeper clean, gently scrub it with mild detergent diluted in warm water, then rinse thoroughly.
-
Inspections: Periodically inspect your screen door for any tears, holes, or loose fasteners. Promptly repair any damage to prevent further deterioration.
-
Protection from the Elements: Position your screen door out of direct sunlight to minimize fading. Consider installing a storm door over the screen door during harsh weather conditions for added protection.
-
Seasonal Maintenance: Before the onset of winter, remove and store your screen door in a dry, protected location to prevent it from being exposed to frost and snow.
By following these recommendations, you can extend the lifespan of your screen door, ensuring it continues to provide comfort and protection for your home.
