How To Tie A Gift Bag Perfectly: A Step-By-Step Guide
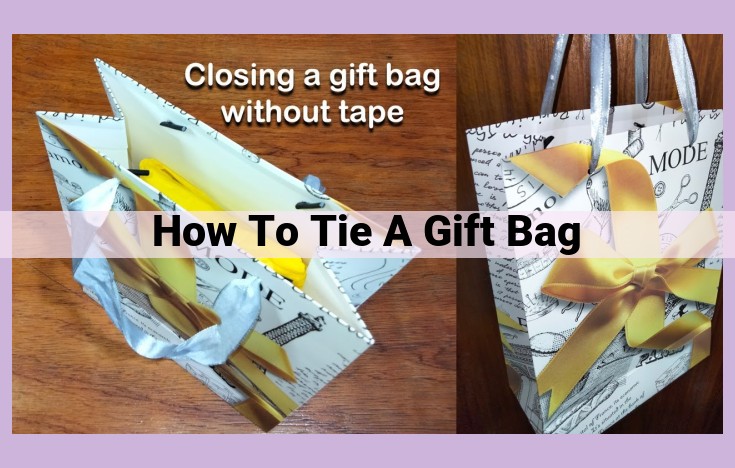
To tie a gift bag:
- Gather the handles at the top center of the bag.
- Cross the right handle over the left and pass the right handle through the loop behind the left handle.
- Pull the right handle tight to form a simple knot.
- Repeat the process with the left handle, crossing it over the right and passing it through the loop behind the right handle.
- Pull the left handle tight to complete the knot.
The Ultimate Guide to Gift Wrapping: Essential Tools and Materials
Essential Tools for Gift Wrapping
When it comes to perfect gift wrapping, the right tools make all the difference. Sharp scissors and durable tape or glue are must-haves. Sharp scissors ensure precise cutting, leaving clean lines and minimizing waste. Durable tape or glue provides secure wrapping, keeping gifts intact during transport and preserving their pristine appearance.
Types of Gift Wrap Materials
The choice of gift wrap material depends on the occasion and your desired aesthetic. Kraft paper offers a rustic charm, while glossy paper adds a touch of elegance. Specialty papers, such as those with embossed designs or metallic accents, can elevate your gifts to a whole new level. Each type of paper has its advantages and uses, so choose the one that best suits your style and the occasion.
Cover different types of wrapping paper, such as kraft, glossy, and specialty papers, and explore the advantages and uses of each.
- Measuring and Cutting the Gift Wrap
Types of Gift Wrap Materials
When embarking on your gift-wrapping journey, understanding the diverse types of wrapping paper is crucial. Each type offers unique advantages and aesthetics, allowing you to tailor your wrapping to the occasion and the recipient’s taste.
-
Kraft Paper: This sturdy, brown paper exudes a rustic charm, perfect for wrapping gifts with a natural or earthy feel. Its versatility makes it suitable for both casual and formal occasions.
-
Glossy Paper: With its smooth, reflective surface, glossy paper adds a touch of elegance to your gifts. It is ideal for showcasing vibrant colors and bold designs, making it a popular choice for festive celebrations.
-
Specialty Papers: These papers go beyond the ordinary, offering a wide range of textures, patterns, and embellishments. Velvet, linen, and metallic papers can elevate your gifts to the realm of luxury, while patterned papers can add a playful touch.
Measuring and Cutting the Gift Wrap
Precision is key to achieving a neat and professional-looking wrapped gift. Here’s how to measure and cut your wrapping paper with accuracy:
-
Measure the gift: Use a measuring tape or ruler to determine the length, width, and height of the gift.
-
Add extra paper: Allow approximately 2 inches of extra paper on each side to ensure complete coverage and secure wrapping.
-
Cut the paper: Use sharp scissors to make clean, straight cuts. Be careful not to tear the paper, as this can ruin the overall presentation.
By following these steps, you can ensure that your gift wrap is the perfect size, enabling you to create a flawlessly wrapped gift that will delight the recipient.
The Art of Precise Gift Wrapping: A Guide to Measuring and Cutting
In the realm of gift-giving, presentation is paramount. A neatly wrapped present can transform an ordinary gift into something extraordinary. Mastering the art of measuring and cutting gift wrap is crucial to achieve a polished and professional-looking finish.
Measure Twice, Cut Once
Before you make any cuts, it’s essential to measure the gift accurately to ensure that the wrap fits snugly without excess waste. Use a measuring tape or a piece of string to determine the length and width of the gift, adding a few extra inches for overlap.
The Right Tools for the Job
Investing in a pair of sharp scissors is key. Dull scissors will tear the paper instead of cutting it cleanly. A sturdy and adhesive tape or glue will also prove invaluable for keeping the wrap securely in place.
Cutting with Precision
Place the gift in the center of the wrap and align the edges of the paper with the sides of the gift. Smooth out the wrap and trim any excess on the ends. For boxes, cut diagonally at the corners to avoid creases.
A Neat and Tidy Finish
To prevent the wrap from sliding off, fold the excess wrap inward on both ends and secure it with tape or glue. This will create a clean and secure closure. By following these simple tips, you’ll elevate your gift-wrapping skills and create presents that are both thoughtful and aesthetically pleasing.
Essential Knots for Artistic Gift Wrapping
Gift wrapping is an art form, and tying the perfect knot is the finishing touch that elevates your present from ordinary to extraordinary. Here’s your guide to master the essential knots that transform your gifts into masterpieces:
Basic Knot
The basic knot is the simplest and most versatile, suitable for all shapes and sizes of gifts.
- Create two loops: Cross the ends of the ribbon to form two loops.
- Loop over: Take the right loop and pass it over the left loop.
- Pull through: Pull the right loop back through the left loop, tightening the knot.
Bow Knot
The bow knot adds a touch of elegance to your gift.
- Basic knot: Start with the basic knot as described above.
- Create loops: Make two new loops, one on each side of the basic knot.
- Cross loops: Cross the left loop over the right loop.
- Pull through: Pull the left loop through the middle of the bow.
- Tighten: Pull the ends of the ribbons to tighten the bow.
Double Bow Knot
For a more elaborate touch, try the double bow knot.
- Two basic knots: Tie two basic knots, one on top of the other.
- Create loops: Make two loops from the ends of the bottom knot.
- Cross loops: Cross the left loop over the right loop.
- Pull through: Pull the left loop through the middle of the bow.
- Tighten: Pull the ends of the ribbons to tighten the bow.
- Repeat: Repeat the steps with the loops from the top knot to create a second bow.
Pull Bow Knot
The pull bow knot adds a festive touch to your gifts.
- Crossing ends: Cross the ends of the ribbon and pull them through a ribbon dispenser.
- Fanning ribbon: Fan the ribbon out to form a circle.
- Pulling strands: Pull on the inner strands of the ribbon to create loops.
- Tying the knot: Pull the outer strands to tighten the knot and shape the bow.
- Adjusting loops: Adjust the loops to create different shapes and sizes.
Demonstrate how to tie different knots that enhance the appearance of your gift, including basic, bow, double bow, and pull bow knots.
- Adding Personal Touches to Gifts
## Essential Knots for Gift Wrapping
Tying the perfect knot can elevate the presentation of your gift and add a touch of personal flair. Let’s explore the different knots that will enhance the beauty of your wrapped presents:
Basic Knot
This simple yet secure knot is perfect for small to medium-sized gifts. Here’s how to do it:
- Cross the two ribbons over each other.
- Take one ribbon and pass it over and under the other ribbon.
- Pull the ribbon through the loop created.
- Repeat on the other side.
Bow Knot
A classic choice that adds a touch of elegance, the bow knot is easy to tie:
- Create a loop by bringing one ribbon over the other.
- Bring the ends of the ribbon behind the loop and cross them over each other.
- Pull the ends through the loop and tighten to form a bow.
Double Bow Knot
For a more elaborate look, the double bow knot adds an extra layer of sophistication:
- Tie a basic bow knot as described above.
- Create another loop with the same ribbon and bring it over the first loop.
- Bring the ends of the ribbon behind the second loop and cross them over each other.
- Pull the ends through the loop and tighten to form a second bow.
Pull Bow Knot
Perfect for adding a whimsical touch, the pull bow knot can be adjusted for different sizes:
- Create an arch by passing one ribbon over the other and holding the ends together.
- Wrap the ribbons around each other several times to create a loop.
- Pull both ends of the ribbon to tighten the loop and create the bow.
Elevate Your Gifts with Personal Touches
Gift wrapping is an art form that transforms ordinary presents into extraordinary expressions of thoughtfulness. By incorporating ribbons, bows, tags, and other decorative elements, you can personalize and elevate your gifts, making them truly unforgettable.
Ribbons: A Touch of Grace and Sophistication
Ribbons add a touch of elegance to any gift. Choose ribbons in colors that complement the gift wrap or the recipient’s personal style. Consider using wider ribbons for a bold statement or narrower ribbons for a more delicate touch. Tie ribbons into loops, bows, or clusters for a touch of charm.
Bows: A Classic Touch of Charm
Bows are a timeless and versatile gift-wrapping accessory. Create simple bows with basic knots or opt for more elaborate styles like double bows or pull bows. Use bows to add a pop of color or texture, or choose bows with metallic accents for a touch of sparkle.
Tags: A Personal Message
Tags are a wonderful way to personalize your gifts. Write a heartfelt message, a special note, or the recipient’s name on a tag. Choose tags that match the wrapping paper or add a contrasting touch. You can also decorate tags with stickers, glitter, or other embellishments.
Other Decorative Elements: Unleash Your Creativity
Beyond ribbons, bows, and tags, there are countless other decorative elements you can use to elevate your gifts. Consider using twine, lace, buttons, sequins, or even dried flowers. Experiment with different textures, colors, and patterns to create a unique and memorable gift wrap.
By incorporating these personal touches, you can transform your gifts into cherished keepsakes that will be treasured long after the presents are gone.
Gift Wrapping: Essential Tips and Techniques
Finding the perfect gift is only half the battle; wrapping it beautifully elevates the experience for both the giver and receiver. Whether you’re a seasoned pro or a novice looking to impress, this comprehensive guide will equip you with the tools and techniques to create stunningly wrapped gifts for any occasion.
Essential Tools for Gift Wrapping
- Sharp scissors: Precise cuts minimize waste and ensure a clean finish.
- Durable tape or glue: Secure your wrapping without tearing or unraveling.
Types of Gift Wrap Materials
- Kraft paper: Natural and eco-friendly, perfect for a rustic or minimalist look.
- Glossy paper: Adds a touch of elegance and subtly reflects light.
- Specialty papers: Embossed, foil-printed, or patterned papers elevate your gifts with unique textures and designs.
Measuring and Cutting the Gift Wrap
- Measure twice, cut once! Use a ruler or tape measure for accuracy.
- Cut the paper 2-3 inches longer than the gift on each edge for a neat wrap.
Techniques for Wrapping Common Gift Shapes
- Boxes: Use the “taped corner” method for secure and elegant wrapping. Crease edges and tape them securely.
- Bags: Fill the bag loosely, tie the handles, and wrap a ribbon around the base for extra style.
- Oddly shaped items: Use smaller pieces of paper to cover awkward contours and secure with tape or glue.
Essential Knots for Gift Wrapping
- Basic knot: A simple and secure knot for small or lightweight gifts.
- Bow knot: A classic choice that adds a touch of elegance.
- Double bow knot: For a more elaborate and impressive presentation.
- Pull bow knot: Easy to tie and creates a voluminous and festive bow.
Adding Personal Touches to Gifts
- Ribbons: Tie around the gift or use them to create intricate bows.
- Bows: Purchase pre-made or create your own using fabric, ribbon, or even paper.
- Tags: Add a personal message or recipient’s name to make the gift extra special.
Gift Wrapping for Special Occasions
- Birthdays: Incorporate bright colors and playful patterns. Use helium balloons or streamers for a festive touch.
- Anniversaries: Opt for elegant and romantic wrapping. Add lace, satin ribbons, or delicate flowers.
- Holidays: Theme your wrapping to the occasion. Use red and green for Christmas, pastels for Easter, or patriotic colors for Independence Day.
Troubleshooting Common Gift Wrapping Issues
- Tears in the paper: Gently tape the tear or overlap the torn edges and secure with glue.
- Uneven wrapping: Remeasure and cut the paper more accurately. Use a straight edge or ruler to ensure straight cuts.
- Difficulty tying knots: Practice makes perfect! Watch tutorials or ask a friend for guidance.
Sustainable Gift Wrapping Practices
- Reusable materials: Use fabric, scarves, or even newspaper as eco-friendly wrapping options.
- Biodegradable paper: Opt for papers made from recycled or sustainable sources.
- Reduce waste: Measure carefully to minimize excess paper. Use smaller pieces to wrap oddly shaped items.
Troubleshooting Common Gift Wrapping Issues
Gift wrapping can be a delightful experience, but it’s not without its challenges. From tearing paper to uneven wrapping, there are plenty of obstacles that can put a damper on your wrapping endeavors. Fear not, because we’ve got you covered!
Tears in the Paper:
Who hasn’t accidentally torn the wrapping paper? It’s a common mishap that can be easily avoided. Make sure your scissors are sharp and that you’re cutting on a flat surface. Avoid pulling or tugging on the paper, and instead use gentle strokes to cut. If a tear does occur, don’t panic! Simply tape it down with some clear tape.
Uneven Wrapping:
Achieving a neat and professional-looking gift wrap requires precision and attention to detail. To ensure even wrapping, measure the gift carefully and cut the paper accordingly. Use a ruler or measuring tape for accuracy. When wrapping, make sure the edges of the paper overlap by at least an inch to prevent tearing.
Difficulty Tying Knots:
Tying a neat bow can be a daunting task, especially if you’re not a seasoned wrapper. But with a little practice, you’ll be a pro in no time. Practice with different types of ribbons and bows to find what works best for you. If you’re struggling, there are numerous online tutorials that can guide you step by step.
Sustainable Gift Wrapping Practices
Gift wrapping doesn’t have to be harmful to the environment. By adopting sustainable practices, you can enjoy the joy of gift giving without contributing to waste. Here are some eco-friendly tips:
- Reusable Materials: Opt for reusable ribbon, bows, and gift bags instead of disposable ones. These can be used multiple times, reducing waste.
- Biodegradable Paper: Choose gift wrap made from biodegradable materials, such as recycled paper or kraft paper. These decompose naturally, unlike traditional wrapping paper.
- Reduce Waste: Minimize waste by cutting the paper to fit the gift snugly. Avoid using excessive layers of paper or unnecessary decorations.
**Gift Wrapping: A Guide to Eco-Friendly Practices**
Wrapping gifts beautifully doesn’t have to come at the expense of the environment. Embrace sustainable gift wrapping and make your presents look as stunning as ever while reducing your impact on the planet.
**Reusable Materials**
Instead of single-use wrapping paper, opt for reusable fabrics or gift bags. These can be reused multiple times, saving resources and creating a zero-waste wrapping experience. Consider repurposing old scarves, pillowcases, or fabric scraps to create unique and eye-catching wraps.
**Biodegradable Paper**
If you prefer the classic wrapping paper look, choose biodegradable options made from plant-based materials. These papers decompose naturally, eliminating the need for landfills and promoting eco-consciousness. Seek papers with certifications like FSC (Forest Stewardship Council) or SFI (Sustainable Forestry Initiative) to ensure responsible sourcing.
**Reduce Waste**
Be mindful of excess waste when wrapping gifts. Measure the paper accurately to minimize cut-offs. Utilize double-sided tape or glue to secure the paper and avoid using excessive tape. Consider reusing ribbons and bows from previous gifts or opt for eco-friendly alternatives like twine or jute.
**Inspirational Eco-Friendly Gift Wrapping Ideas**
Elevate your sustainable wrapping game with these unique and inspiring ideas:
-
Kraft paper with natural botanicals: Adorn kraft paper with leaves, twigs, or flowers for an organic and earthy touch.
-
Fabric scraps and embellishments: Transform fabric scraps into charming gift wraps and add personal touches with beads, buttons, or tassels.
-
Recycled paper gift tags: Create custom gift tags from recycled paper or cardboard, adding handwritten messages or decorative elements.
-
Furoshiki wrapping: Learn the art of Japanese furoshiki, where fabric squares are used to wrap gifts in sustainable and elegant ways.
-
Biodegradable bows and ribbons: Choose bows and ribbons made from materials like jute, hemp, or cotton to complete your eco-friendly gift presentation.
The Art of Gift Wrapping: A Visual Feast to Inspire
Unveil the dazzling world of gift wrapping, where artistry meets practicality. Allow this blog to be your guide as we embark on a visual journey that will elevate your gifting game to new heights.
Escape the mundane and immerse yourself in a tapestry of wrapping techniques that will transform your presents into captivating works of art. From classic elegance to modern whimsy, we’ll showcase gift wrapping ideas that will leave your loved ones breathless.
Feast your eyes on perfectly wrapped boxes adorned with intricate ribbons, bows that dance with graceful fluidity, and tags that whisper sweet sentiments. Allow our master wrappers to demonstrate tips and tricks that will simplify the wrapping process while maximizing the wow factor.
But fear not, our quest for gift wrapping excellence doesn’t end there. We’ll delve into sustainable practices, proving that eco-friendliness can go hand in hand with eye-catching aesthetics. From reusable fabrics to biodegradable materials, we’ll empower you to wrap with a conscience.
As the grand finale, we’ll unveil a gallery of inspirational gift wrapping ideas. Prepare to be mesmerized by creations that will ignite your imagination and leave you longing to wrap every gift with a touch of extraordinary flair.
So, gather your crafting supplies and let us guide you on this extraordinary journey. Together, we’ll transform your gifts from ordinary to enchanting and create memories that will be cherished long after the ribbons are untied.
