Ultimate Guide: Removing Melted Plastic From Oven Surfaces Effortlessly
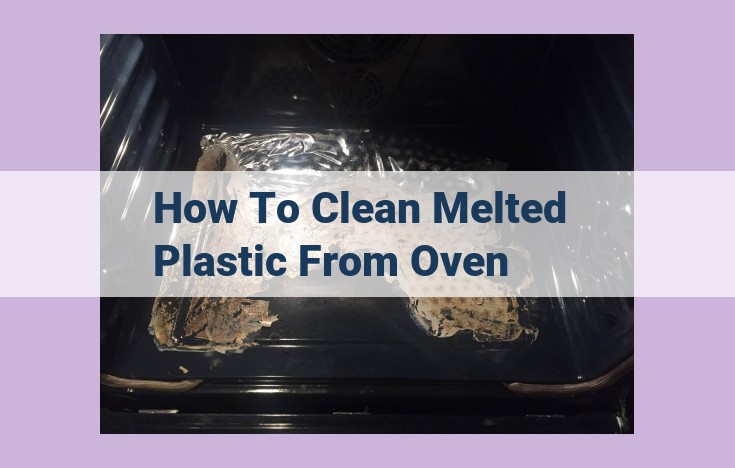
To clean melted plastic from the oven: remove it once cool & solid. Use a plastic scraper to remove excess plastic. Create a paste with baking soda and water and apply it to the affected area. Let it sit for 15 minutes and scrub with a sponge. Rinse with vinegar to neutralize the baking soda. Wash with dish soap and water. If the plastic is still visible, use an oven cleaner specifically designed for plastic surfaces, following the instructions carefully.
Essential Cleaning Materials and Tools for a Spotless Kitchen
Welcome to the ultimate guide to essential cleaning materials and tools for your kitchen! Keeping your kitchen clean and hygienic is fundamental for a healthy and enjoyable cooking experience. To help you achieve a sparkling kitchen, let’s explore the must-have tools and materials that will transform your cleaning routine.
The Cleaning Arsenal: Your Essential Allies
Every kitchen warrior needs a reliable arsenal of cleaning weapons. Essential cleaning tools include plastic scrapers to gently remove stubborn food residue, baking soda and vinegar for their natural cleaning power, and dish soap for grease-fighting action. Don’t forget the powerhouse of oven cleaners, specifically designed to tackle the toughest grime in your oven. These tools and materials will equip you to conquer any kitchen cleaning challenge.
Unleashing the Power of Essential Materials
Plastic scrapers are gentle giants that effortlessly lift off food particles from surfaces without scratching. They’re perfect for removing burnt-on residue from pots and pans. The dynamic duo of baking soda and vinegar tackles stains and odors with ease. Baking soda is a natural deodorizer, while vinegar cuts through dirt and grime. Dish soap, the grease-dissolving workhorse, is essential for cleaning dishes and degreasing surfaces. Finally, oven cleaners, with their potent formulas, make oven cleaning a breeze by dissolving caked-on grease and food spills.
Specific Kitchenware Cleaning: A Comprehensive Guide
Maintaining a sparkling clean kitchen is essential for health and well-being. However, cleaning specific kitchenware can be a daunting task. Fret not, as we’ve compiled a comprehensive guide to help you tackle this chore with ease.
Spatulas and Scrub Brushes:
Kiss greasy spatulas goodbye! Soak them in a hot soapy water bath for 30 minutes, then gently scrub away the grime with a sponge. For stubborn stains, sprinkle baking soda on the spatula and let it sit for a few minutes before scrubbing. Scrub brushes, on the other hand, can be revitalized by boiling them in a vinegar-water solution for 5 minutes.
Oven Racks:
Give your oven racks a deep clean by removing them and soaking them in a bathtub filled with hot water and dish soap. Allow them to soak for several hours, then scrub them with a stiff-bristled brush. For stubborn grease, use a commercial oven cleaner, following the instructions carefully.
Cookie Sheets and Pans:
Say goodbye to burnt-on food! Line cookie sheets and pans with foil before baking to prevent mess. For existing stains, soak them in a baking soda and vinegar solution for 30 minutes. Scrub with a sponge or nylon brush, then rinse thoroughly.
Pots:
Restore your pots to their former glory! Fill them with water and bring to a boil. Add baking soda or vinegar depending on the stain type. Let it simmer for 15 minutes, then drain and scrub with a non-abrasive sponge. For tough stains, use a commercial cookware cleaner.
Tips for Removing Stubborn Stains:
- Baking soda: A natural cleaner that effectively removes stains from plastic and metal.
- Vinegar: An acidic solution that cuts through grease and deodorizes.
- Lemon juice: A natural bleaching agent that can brighten discolored surfaces.
- Hydrogen peroxide: A powerful cleaning agent that removes stains from white fabrics and surfaces.
Restoring Shine:
- Olive oil: Rub a small amount of olive oil on stainless steel or chrome surfaces to restore shine.
- Baking soda and water: Create a paste and apply it to brass surfaces, let it sit for 15 minutes, then wipe away to reveal a lustrous shine.
- Lemon juice and salt: Sprinkle salt on a cut lemon and rub it on copper surfaces to remove tarnish and restore shine.
Understanding Plastic Types: A Kitchen Cleaning Guide
Navigating the labyrinth of plastic materials in your kitchen can be a daunting task. Different types of plastics require specific cleaning techniques to avoid damage and maintain their pristine condition. Here’s an in-depth guide to help you tackle this challenge:
Types of Kitchen Plastics
1. Polyethylene (PE):
Commonly used in cling wrap, storage containers, and cutting boards. It is flexible, durable, and resistant to chemicals.
2. Polypropylene (PP):
Found in microwaveable containers, yogurt cups, and straws. It is lightweight, stiff, and heat-resistant.
3. High-Density Polyethylene (HDPE):
Used in milk jugs, detergent bottles, and crates. It is rigid, opaque, and chemical-resistant.
4. Polyvinyl Chloride (PVC):
Common in plumbing pipes, flooring, and some kitchenware. It is strong, durable, but less flexible than other plastics.
Cleaning Techniques for Different Plastic Types
General Guidelines:
- Always read the manufacturer’s instructions for specific cleaning recommendations.
- Use mild detergents and avoid abrasive cleaners or sponges.
- Rinse thoroughly with clean water after washing.
- Air dry or use a clean towel to prevent streaks.
Specific Types:
- PE: Can be washed in warm, soapy water. Avoid using bleach or other harsh chemicals.
- PP: Tolerates higher temperatures and can be washed in the dishwasher on the top rack.
- HDPE: Durable and can withstand most cleaning methods. However, avoid using sharp objects that could scratch the surface.
- PVC: Can be cleaned with mild detergents, but avoid using heat or abrasive cleaners as they can damage the material.
Choosing the Right Oven Cleaning Products: A Guide to Restoring Your Oven’s Shine
When it comes to maintaining a spotless kitchen, your oven deserves special attention. The constant exposure to food splatters, grease, and grime can make it a breeding ground for bacteria and unpleasant odors. To combat this, choosing the right oven cleaning products is crucial.
Types of Oven Cleaning Products
The market offers an array of oven cleaning products, each with its own strengths and limitations. The most common types include:
- Foams: These products expand into thick foam, which clings to the oven’s surface. They are ideal for removing light grease and dirt but may struggle with stubborn stains.
- Powders: Powdered oven cleaners are highly effective against tough grease and grime. However, they can be abrasive and should be used with caution on delicate surfaces.
- Gels: Gel-based cleaners are similar to foams but offer a thicker consistency. They provide longer contact time with the oven’s surface, making them more effective for removing baked-on stains.
- Steam cleaners: These appliances use pressurized steam to dissolve grease and dirt. They are a gentle option suitable for all types of ovens, including those with delicate enamel finishes.
Effectiveness Considerations
When selecting an oven cleaning product, consider its effectiveness against common oven contaminants:
- Grease: Look for products containing surfactants, which emulsify and break down grease.
- Baked-on food: Choose products with alkaline ingredients like sodium hydroxide or potassium hydroxide, which dissolve burned-on residue.
- Charred stains: Some products contain abrasive particles that can remove charred stains, but use them with caution to avoid scratching the oven’s surface.
Safety Precautions
Oven cleaning products can contain harsh chemicals, so it’s important to prioritize safety:
- Wear gloves and eye protection: Avoid skin and eye contact with cleaning solutions.
- Ventilate the area: Open windows or use a fan to ensure proper ventilation during and after cleaning.
- Follow manufacturer’s instructions: Strictly adhere to the product’s instructions for usage, time, and disposal.
- Avoid mixing products: Never mix different oven cleaning products, as this can create dangerous fumes.
Advanced Kitchenware Cleaning Techniques for Restoring Pristine Condition
When it comes to maintaining a sparkling clean kitchen, it’s not just about regular cleaning tasks. Sometimes, you encounter persistent grime that requires more than just soap and water. That’s where advanced cleaning techniques come into play, empowering you to banish deep-seated dirt and restore your kitchenware to its former glory.
One such technique is the use of heat. Heat can effectively loosen baked-on grease and food particles, making them easier to remove. For example, you can place a pot or pan with burnt-on food in a hot oven for 15-20 minutes. The heat will cause the food residue to loosen, allowing you to scrape it off effortlessly.
Another advanced cleaning tool is the specialized brush. These brushes are designed with stiff bristles that can penetrate deep into crevices and corners, removing stubborn dirt that regular brushes can’t reach. For instance, you can use a long-handled brush to scrub the interior of a narrow-necked bottle or a wire brush to remove burnt-on food from a grill.
In some cases, chemical cleaning agents may be necessary to tackle particularly tough stains or grime. However, it’s crucial to use them with caution and follow the manufacturer’s instructions carefully. Always test the cleaning agent in an inconspicuous area first to ensure it doesn’t damage the surface.
By embracing these advanced cleaning techniques, you can effectively remove deep-seated grime, restore the shine of your kitchenware, and maintain a cleaner and more hygienic kitchen environment. Remember to choose the most appropriate technique based on the type of stain or dirt you’re dealing with, and always prioritize the safety of your hands and surfaces.
