Master The Art Of Homemade Pie Crust: A Comprehensive Guide
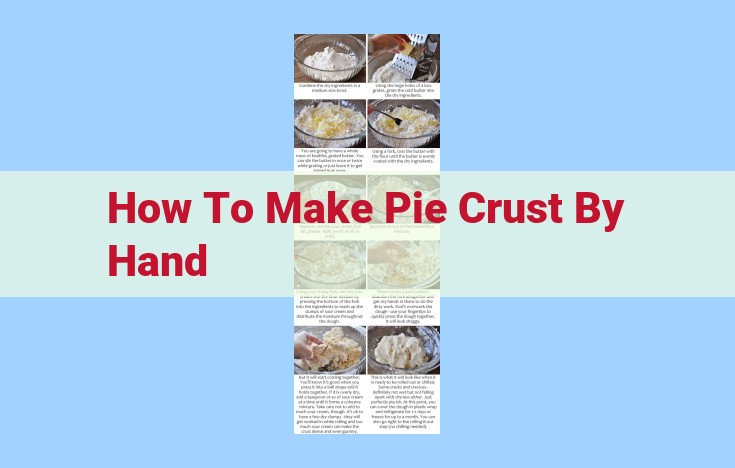
To make pie crust by hand, gather essential ingredients (flour, salt, sugar, fat, water) and tools (measuring cups, bowls, pastry cutter, rolling pin, pie plate). Cut cold fat into flour mixture, roll out dough thinly, and crimp edges. Chill dough to prevent gluten formation and for easier handling. Bake in preheated oven until golden brown. Utilize additional tools like bench scrapers, plastic wrap, and chillers to enhance the process and achieve a flaky, tender crust.
Baking a Pie from Scratch: A Flour-Centric Journey
The foundation of every delectable pie lies in its flour, the humble ingredient that bestows structure and texture upon this culinary masterpiece. Without flour, our pies would crumble into a sorry mess, bereft of the flaky layers and sturdy base that define a perfect pie crust.
When crafting your own pie dough, it’s crucial to select the right flour. All-purpose flour is the versatile choice, striking a balance between strength and tenderness. For a crispier crust, opt for bread flour with its higher protein content. If you prefer a flaky, melt-in-your-mouth texture, pastry flour is your go-to.
The amount of flour used in your pie crust also significantly impacts its texture. Too little flour may result in a sticky, soggy crust, while too much will yield a tough, inedible barrier. Follow the recipe precisely and adjust the flour as needed based on the humidity and consistency of your dough.
As you work with the flour, remember to handle it gently. Overworking the dough can develop the gluten, resulting in a tough crust. Instead, use a pastry cutter or your fingertips to gently work the flour into the fat, creating a crumbly mixture.
By embracing these flour-centric techniques, you’ll lay the foundation for an exceptional pie crust, ready to support and enhance the flavors of your chosen filling. So, let the flour be your guide as you embark on this culinary adventure!
The Symphony of Salt: Enhancing Pie Crust Perfection
In the culinary realm of pie making, salt plays an essential role, a delicate touch that elevates the flavors and orchestrates the balance of sweetness. It’s like a seasoned maestro, deftly conducting the ingredients to create a harmony of flavors.
Without salt, pie crusts would be insipid and flat, their sweetness overpowering. But when added in just the right amount, salt enhances the natural nuances of the flour and butter, bringing depth and complexity to the taste. It’s the subtle counterpoint that awakens the other flavors, making them sing in unison.
Salt also balances the often overwhelming sweetness of fillings, whether it’s the tartness of apples or the lusciousness of berries. It acts as a culinary mediator, negotiating between the extremes of sweetness and tartness, creating a unified and pleasing flavor profile.
So, when you reach for the salt shaker to season your pie crust, remember that you’re not just adding a dash of sodium, but unlocking a hidden symphony of flavors. It’s the secret ingredient that transforms an ordinary crust into an extraordinary canvas, ready to paint a masterpiece of culinary delight.
The Sweetening Power of Sugar: Enhancing Pie Crust Flavor and Appearance
Imagine biting into a freshly baked pie, the flaky crust melting in your mouth, tantalizing your taste buds. One element that contributes to this culinary delight is the sugar, which not only adds a touch of sweetness but also plays a crucial role in the crust’s irresistible golden-brown color.
Sweetening the Crust: A Subtle Delicacy
The addition of sugar to pie crust dough is a subtle yet effective way to enhance its flavor profile. While the main ingredients, such as flour, salt, and fat, provide the foundation for the crust, sugar brings a hint of sweetness that balances the savory notes of the other ingredients, creating a harmonious symphony of flavors.
Promoting Crust Browning: A Golden Transformation
Beyond its flavor-enhancing properties, sugar also plays a pivotal role in the crust’s beautiful golden-brown appearance. When baked, the sugar undergoes a process called caramelization, where its molecules bond together to form a rich, amber-colored compound. This caramelization process not only adds a visually appealing color to the crust but also contributes to its distinctive nutty, slightly smoky flavor.
Tips for Achieving the Perfect Sweet Crust
To ensure your pie crust boasts the perfect balance of sweetness and color, consider the following tips:
- Use the right amount of sugar: Add too little sugar, and the crust will lack sweetness and browning potential. Conversely, too much sugar can result in a caramelized crust that is overly sweet and potentially burnt.
- Dissolve the sugar before adding it: Dissolving the sugar in a small amount of water before incorporating it into the dry ingredients helps prevent lumps and ensures even distribution throughout the crust.
- Chilling the dough: Chilling the dough before rolling it out inhibits gluten formation, resulting in a more flaky and tender crust. The chilling process also helps control the spread of the sugar, preventing it from burning and becoming overly caramelized.
Incorporating the sweetening power of sugar into your pie crust elevates it from a mere pastry shell to an integral part of your culinary masterpiece, delighting your senses with both flavor and visual appeal. So, the next time you embark on the art of pie-making, remember the transformative magic of sugar, and create a crust that will tantalize your taste buds and captivate your eyes.
The Role of Fat in Crafting Flaky, Tender Pie Crusts
In the realm of baking, the path to a perfect pie crust is paved with essential ingredients that work harmoniously together. Among these crucial elements, fat stands as a culinary maestro, wielding its transformative power to bestow upon the crust its coveted flakiness and tender texture.
The magic of fat lies in its ability to shorten the gluten in the flour. Gluten, a protein found in wheat flour, forms a network of elastic strands when hydrated. This network gives baked goods their structure, but too much gluten can result in a tough, chewy crust.
Fat, when incorporated into the flour mixture, coats the gluten strands, preventing them from forming a tight network. This process is known as cutting in, and it’s a crucial step in creating a flaky, tender crust.
A variety of fats can be used for pie crusts, each offering its own unique characteristics. Butter is a classic choice, prized for its rich flavor and creamy texture. Shortening is a hydrogenated vegetable oil that produces a more uniform flakiness and a higher melting point, making it a suitable option for hot fillings. Lard, rendered from pork fat, adds a savory depth of flavor and promotes a particularly tender crust.
When selecting a fat for your pie crust, consider the desired texture and flavor profile. High-fat content fats, such as butter or shortening, will result in a more tender crust, while lower-fat content fats, such as vegetable oil, will produce a crispier crust.
Incorporating fat into the flour mixture requires precision and finesse. The most common method is cutting in, which involves using two knives or a pastry cutter to break the fat into small pieces and distribute it evenly throughout the flour. Alternatively, rubbing the fat into the flour with your fingertips can produce a finer texture.
Once the fat has been cut in, rolling the dough becomes a crucial step. Rolling helps distribute the fat evenly and flatten the dough to a uniform thickness. Chilling the dough before rolling prevents the fat from melting too quickly, ensuring a more flaky crust.
By mastering the art of incorporating fat into your pie crust, you unlock the gateway to a flaky, tender masterpiece. So, the next time you embark on a pie-baking adventure, let the transformative power of fat guide you towards a truly exceptional culinary experience.
Essential Ingredients of a Perfect Pie Crust: A Symphony of Flavors and Textures
As the foundation of a delectable pie, the crust plays a crucial role in delivering the perfect harmony of flavors and textures. A well-crafted crust not only enhances the allure of the filling but also provides a satisfying structural backbone. Among the essential ingredients, water emerges as the life-giving element that orchestrates the union of all components, allowing them to transform into a cohesive dough.
The Vital Role of Water in Pie Crust Formation:
Water’s role in the formation of a pie crust is paramount. It acts as the catalyst that activates and harmonizes the other ingredients, enabling them to form a cohesive dough with the perfect balance of elasticity and flakiness. When added to the flour, water hydrates the gluten proteins, causing them to form a network of elastic strands. This network provides the crust with its structure, preventing it from becoming too brittle or crumbly.
Balancing Hydration for the Perfect Texture:
The amount of water added to the pie crust dough is a delicate balancing act. Too little water can result in a dry, crumbly crust, while too much water can create a dough that is difficult to roll out and prone to tearing. The ideal dough should be pliable enough to roll out without cracking but not so wet that it sticks to the rolling pin.
Chilling for Optimum Dough Development:
After the water has been incorporated into the dough, chilling is essential for further gluten development and the enhancement of flakiness. The cold temperature slows down the hydration process, allowing the gluten proteins to align and form a stronger network. This results in a pie crust that is both tender and flaky, with a melt-in-your-mouth texture.
Combining the Elements for Crust Perfection:
In the realm of pie crusts, water is an indispensable ingredient, playing a pivotal role in the dough’s formation, texture, and ultimate flavor profile. By understanding the importance of water and its harmonious interaction with the other ingredients, you can unlock the secrets to creating a pie crust that will elevate your culinary creations to new heights.
Essential Tools for Baking the Perfect Pie Crust: A Journey into Precision
When it comes to creating a divine pie crust, precision is paramount. Enter measuring cups and spoons, our humble yet indispensable tools that guide us towards a culinary masterpiece.
Imagine a symphony of flavors, where each ingredient plays its part in harmony. Precise measurements are the conductor of this culinary symphony, ensuring that each note, from the delicate sweetness of sugar to the savory depth of salt, reaches our palate in perfect balance.
Measuring cups are the larger instruments of this orchestra, handling the liquid ingredients like water and milk. Their graduated markings provide a clear guide, allowing us to pour exactly the amount required, no more, no less.
Measuring spoons, on the other hand, handle the smaller, more precious ingredients. From teaspoons of sugar to quarter-teaspoons of baking powder, these pint-sized helpers ensure that each ingredient whispers its subtle magic into the dough, without overpowering the symphony.
Without the precision of measuring cups and spoons, our pie crust would be a culinary cacophony. Instead, it transforms into a symphony of flavors, a masterpiece of pastry that enchants our taste buds and leaves us longing for more. So, let us embrace the precision that these humble tools offer, and let the music of baking fill our kitchens.
Mixing bowls: Provide ample space for mixing and combining ingredients.
Mixing Bowls: Essential Vessels for Pie-Crust Creation
In the culinary symphony of pie-making, mixing bowls play a pivotal role, providing an ample stage where ingredients mingle and transform into a pliable dough.
An Expansive Canvas for Baking Bliss
Mixing bowls are more than mere containers; they’re sanctuaries where flour dances with sugar, salt adds its savory touch, and chilled butter is lovingly integrated into the mix. Their spacious embrace allows you to work with ease, preventing spills and ensuring even distribution of ingredients.
Choosing the Right Bowls for Your Needs
The optimal choice of mixing bowl depends on your intended dough quantity and its consistency. For small crusts, a medium-sized bowl will suffice, while larger batches may require a more capacious vessel.
Materials and Construction: A Balancing Act
Mixing bowls come in various materials, each with unique benefits. Glass bowls offer clarity for monitoring the dough’s progress, while stainless steel bowls provide durability and a cool touch. Plastic bowls are lightweight and prevent dough from sticking, making them ideal for working with sticky mixtures.
Essential Tips for Mixing Success
- Chilling the Bowls: For flaky, tender crusts, pre-chill your mixing bowls in the refrigerator or freezer. This helps keep the butter cold, preventing it from melting and toughening the dough.
- Measuring Precisely: Accurate measurements are crucial for a successful pie crust. Use measuring cups and spoons to ensure the correct proportions of each ingredient.
- Mixing Technique: When incorporating the butter into the flour mixture, use a pastry cutter or two forks to create a crumbly texture. Avoid overmixing, as this can develop gluten and result in a tough crust.
A Pie Crust’s Journey: The Power of Cutting In
The dance between flour and fat is the enigmatic heart of a flaky, tender pie crust. The cutting in technique is the culinary ballet that allows the cold butter or shortening to weave its buttery magic into the embrace of flour.
Imagine a labyrinth of flour particles, waiting for the arrival of their icy partner. As the pastry cutter or the diligent prongs of two forks waltz through the flour, they rhythmically cleave butter into tender, pea-sized pockets. This delicate dance mimics the frost crystals that form in cold weather, creating airy pockets that will yield a crust with an irresistible melt-in-your-mouth texture.
The cutting in process must be executed with precision and control. Overworked fat will toughen the crust, while underworked fat won’t create the necessary flakiness. The key is to maintain the cold temperature of the butter or shortening, preventing it from softening and melting prematurely. This cold, controlled cutting ensures that the fat remains in its original form, creating pockets of steam that puff up during baking and impart that delectable, airy texture.
As you work the fat into the flour, the mixture will transform from a fine powder to a crumbly, coarse texture. This is the hallmark of a perfectly cut-in crust, ready to be nurtured into a supple, workable dough.
The Magic of the Rolling Pin: Rolling Out a Perfect Pie Crust
Unveiling the Secrets of Pie Making
Creating a delectable pie requires an understanding of the essential ingredients, tools, and techniques involved. Among these, the rolling pin holds a pivotal role in transforming ordinary dough into an extraordinary culinary canvas.
The Essence of Rolling
The primary purpose of a rolling pin is to flatten the dough to a uniform thickness. This meticulous rolling process ensures that the pie crust bakes evenly, preventing undercooked spots and ensuring a tantalizing golden brown exterior.
Choosing the Right Rolling Pin
Selecting the ideal rolling pin depends on your preferences and the type of crust you desire. Traditional wooden rolling pins offer a classic touch, while marble rolling pins provide a smooth, chilled surface for effortless rolling.
The Art of Cutting and Tapering
Before embarking on the rolling process, divide the dough into two equal portions. Place one portion on a lightly floured surface and flatten it slightly with your hands. Use a pastry cutter or two forks to cut the cold butter or shortening into the flour mixture, creating a crumbly texture.
Rolling Away
With your rolling pin in hand, begin rolling the dough away from you, applying gentle yet firm pressure. Rotate the dough a quarter turn after each pass to ensure even rolling. The dough should be rolled into a thin sheet, approximately 1/8 inch thick. If the dough becomes too sticky, chill it in the refrigerator for a few minutes before continuing.
Shaping the Crust
Once the dough is rolled out, transfer it to a pie plate. Trim the edges using a sharp knife or pastry cutter, leaving a 1-inch overhang. Fold the overhang under the dough and crimp the edges with a fork or your fingers to seal. Prick the bottom of the crust with a fork to prevent air bubbles from forming during baking.
Crafting the Perfect Pie: Essential Tools and Techniques
The Pie Plate: A Culinary Canvas
The pie plate serves as the foundation for your culinary masterpiece, a canvas upon which the intricate tapestry of flavors will come to life. It cradles the tender crust, providing a sturdy framework that supports the abundant filling.
The choice of pie plate is not to be taken lightly. It should be oven-safe and of appropriate size, providing ample room for the crust to extend beyond the rim. Glass or ceramic pie plates are ideal, as they allow you to monitor the crust’s golden transformation.
Preparing the Pie Plate
Before filling your pie plate, it’s crucial to prepare it with care. Lightly grease the interior with butter or cooking spray to prevent the crust from sticking. For extra insurance, consider lining the bottom of the plate with a layer of parchment paper.
Rolling Out the Crust
With a rolling pin, transform a disc of dough into a thin, uniform sheet. Sprinkle the work surface with flour or cornstarch to prevent the dough from sticking. Roll the dough out from the center, working your way outwards in even strokes.
Fitting the Crust
Once the dough is rolled out, carefully lift it onto the prepared pie plate. Gently press the dough into the corners and along the sides, ensuring it conforms to the shape of the plate. Trim any excess dough around the edges, leaving a slight overhang.
Sealing the Edges
To ensure a leak-proof seal, crimp the edges of the crust by folding the overhanging dough under itself. Use a fork or your fingers to create decorative designs, adding a touch of rustic charm to your masterpiece.
Essential Elements to Seal the Perfect Pie Crust:
When it comes to baking a flawless pie, the art of sealing the edges of the crust holds immense importance. This seemingly simple act not only prevents leaks but also adds a touch of rustic charm. Two essential tools come into play here: the unassuming fork and the delicate pastry brush.
The Sturdy Fork:
For a secure, decorative seal, the tines of a fork provide the perfect solution. Gently press the tines along the edges of the crust, creating a series of indentations. These imprints not only seal the crust but also add a touch of whimsy to your culinary creation. The resulting pattern resembles a row of tiny scallops, adding a unique aesthetic element to your pie.
The Delicate Pastry Brush:
For a more refined finish, a pastry brush becomes your trusted companion. Dip the bristles into water or egg wash and carefully brush along the edges of the crust. The liquid will act as an adhesive, bonding the edges together and preventing any unwanted leakage. Additionally, the glossy glaze created by the egg wash enhances the golden-brown complexion of your pie.
Tips for Sealing Success:
- Preheat: Ensure your oven is preheated before baking to prevent the edges from drying out and losing their ability to seal.
- Trim: Trim any excess dough around the edges of the pie plate to create a clean, straight line for easier sealing.
- Crimp: Before sealing, crimp the edges of the crust to reinforce the bond and create an attractive design.
- Chill: Chilling the pie crust before baking helps prevent shrinkage and ensures a more uniform seal.
Embrace the art of sealing your pie crust with these essential tools and techniques. From the rustic charm of the fork to the elegant glaze of the pastry brush, these methods will not only enhance the taste of your pie but also elevate its presentation. So, the next time you embark on a pie-baking adventure, remember the importance of a well-sealed crust—it’s the key to a culinary masterpiece that will impress all who taste it.
Essential Techniques: Cutting In
In the realm of pie-making, the art of cutting in is a sacred ritual that transforms a simple flour mixture into a flaky, delectable crust. It is the key to creating that coveted crumbly texture that melts in your mouth.
Imagine yourself in a cozy kitchen, surrounded by the sweet aroma of flour and the gentle hum of a food processor. As you measure the ingredients, you can almost taste the masterpiece that awaits. But before you can embark on the baking adventure, there’s the crucial step of cutting in the fat.
Whether you choose butter, shortening, or lard, cold fat is the magic ingredient that will create those flaky layers. Using a pastry cutter or two forks, you gently cut the cold fat into the flour mixture. With each stroke, you create tiny pockets of air that will later expand in the oven, resulting in a light and airy crust.
Note: Overworking the dough at this stage will develop the gluten in the flour, making it tough. Aim for a crumbly texture, like coarse breadcrumbs. If the mixture becomes too fine, add a tablespoon or two of ice water to keep it from becoming a paste.
Once you have achieved the perfect crumbly consistency, the mixture is ready to be rolled and shaped into your desired pie crust. Don’t be afraid to experiment with different techniques, such as folding and layering the dough, to create unique and eye-catching crusts.
Remember, the joy of pie-making lies in the process itself. Embrace the cutting-in technique, and let the aroma of freshly baked crust fill your kitchen with warmth and contentment.
Rolling: The Art of Shaping a Perfect Pie Crust
When crafting a delectable pie, rolling out the dough is a crucial step that ensures uniform thickness, resulting in even cooking and a flaky, tender crust.
Visualize your dough as a blank canvas, ready to be transformed into a masterpiece. Lightly flour a clean surface and gently roll the dough from the center outwards, applying even pressure. This gentle motion helps flatten the dough while maintaining its integrity.
As you roll, pay attention to the thickness of the dough. Aim for a consistent thickness throughout, ensuring that the pie will bake evenly. Use a rolling pin with adjustable rings to achieve the desired thickness effortlessly.
To achieve the perfect circular shape, rotate the dough by a quarter of a turn every few rolls. This prevents the dough from sticking to the surface and eliminates uneven edges. By rolling the dough with intention, you create a uniform canvas for your sweet or savory filling.
Crimping: Seals the edges of the crust together, preventing leaks and creating a decorative edge.
Crimping: The Art of Sealing and Adorning Your Pie Crust
Like a skilled seamstress, crimping transforms the edges of your pie crust from a ragged seam into an intricate work of art. This essential technique不仅 seals the crust, preventing unwanted leaks, but also adds a delicate decorative touch that elevates your pie to a culinary masterpiece.
There are multiple methods for crimping, each with its unique appeal. The classic fold-and-press technique involves folding the crust over itself, pressing it firmly to seal the edge, and then repeating the process with overlapping folds. This simple yet effective method creates a tight seal and a slightly ruffled edge.
For a more intricate look, try the braided crimp. Divide the crust into equal sections, and then braid them together around the edge of the pie plate. The resulting weave not only looks stunning but also provides added strength to the crust.
Another popular option is the fork crimp. Use a fork to gently press down on the crust edge, creating a series of evenly spaced indentations. The fork’s tines form a decorative pattern while also sealing the crust securely.
No matter which technique you choose, there are a few key tips to ensure success. First, make sure your crust is cold and firm before crimping. Cold dough is less likely to tear or spread. Use your fingers to lightly flour the edge of the crust before crimping, as this will help prevent sticking. And finally, don’t be afraid to experiment with different crimping techniques to find the one that best suits your style and the occasion.
Crimping is not just a practical step in pie-making but an opportunity to personalize and enhance your culinary creation. It’s a way to add a final touch of artistry and express your creativity. So, grab your pie crust, choose your favorite crimping method, and prepare to seal and adorn your pie with style.
The Art of Blending: A Crucial Step for a Perfect Pie Crust
Amidst the symphony of ingredients and techniques that orchestrate a delectable pie, the art of blending stands tall as an unsung hero. This seemingly simple act of mixing holds the key to unlocking the symphony of flavors and textures that define the ideal pie crust. Join us as we embark on a culinary journey, unraveling the secrets of blending and its transformative power.
The Alchemy of Ingredients
The stage is set with an ensemble of essential ingredients: flour, salt, sugar, fat, and water. Flour provides the sturdy foundation, while salt enhances the flavor profile. Sugar adds a touch of sweetness, while fat contributes to the coveted flakey texture. Water brings the ingredients together, forming a cohesive dough.
Perfecting the Technique
Blending is not a mere act of stirring; it is a delicate balance between finesse and efficiency. Begin by whisking together the dry ingredients in a spacious mixing bowl. Slowly add the cold, cubed fat, employing a pastry cutter or two icy forks. Work the fat into the flour mixture using a gentle cutting motion, creating small, pea-sized clumps.
Achieving Desired Consistency
Observe the consistency of the mixture as you work. If it appears too dry, add tiny amounts of ice water, one tablespoon at a time. If it becomes too wet, sprinkle in additional flour, again in small increments. The ideal dough should be cohesive but not sticky, resembling a crumbly, coarse mixture.
Embracing the Chilling Time
Once blended, form the dough into a disk, wrap it tightly in plastic wrap, and let it rest in the refrigerator for at least 30 minutes. This chilling time allows the fat to solidify and the gluten in the flour to relax, ensuring a tender, flaky crust when rolled out.
Blending, the often-overlooked step, plays a pivotal role in creating a superior pie crust. By mastering the technique and understanding the interplay of ingredients, you can craft a crust that complements and enhances any filling, transforming your pie into a culinary masterpiece. Embrace the alchemy of blending and witness the transformative power it holds in elevating your pie-making prowess to new heights.
Shaping the Crust: A Culinary Canvas
As you gather your freshly made dough, the tantalizing aroma of butter and flour mingles in the air. The moment has arrived to transform this humble mixture into a golden canvas for your culinary masterpiece.
Hand-shaping: A Tactile Symphony
With delicate hands, gently coax the dough onto a lightly floured surface. Using your fingertips, carefully pat it into a flat disk. Summoning the rhythm of a maestro, engage in a graceful waltz with the rolling pin. Gradually work your way from the center outwards, applying even pressure. As the dough gracefully yields, you will witness it elongate and expand before your very eyes.
Mold-assisted Precision
Alternatively, embrace the precision of molds. Select a mold that corresponds to the desired size and shape of your pie. Gingerly place the dough inside, allowing it to nestle snugly within the confines. With a deft tap and smooth motion, gently press the dough outward, ensuring it conforms seamlessly to the mold’s contours. The result? A perfectly shaped crust, ready to cradle your delectable filling.
The Finishing Touches
Fold the dough edges over to enclose the lip of the pie plate. For a professional touch, execute the crimping technique. Use a fork or pastry brush to gently press the edges together, creating intricate designs that not only seal the crust but also add a decorative flair.
Remember, shaping the pie crust is not merely a culinary act; it is a ritual that transforms humble ingredients into a vessel of culinary delight. Approach it with patience, care, and a touch of artistry. Each step brings you closer to crafting a masterpiece that will tantalize your taste buds and ignite your passion for baking.
The Art of Pie Crust Mastery: Essential Ingredients and Tools for Culinary Success
In the realm of culinary delights, few desserts hold as much allure as the humble yet extraordinary pie. Its flaky crust and delectable filling create a symphony of flavors that tantalize the senses. If you aspire to elevate your pie-making skills, it’s crucial to understand the fundamental ingredients and tools that will guide you toward pastry perfection.
Essential Ingredients: The Foundation of a Magnificent Crust
-
Flour: The backbone of any pie crust, flour provides the structure and body that holds the filling captive. Whether you prefer all-purpose flour or a specialized pastry flour, ensure its freshness for optimal results.
-
Salt: An unsung hero in pie crusts, salt serves as a flavor enhancer and balances the sweetness of fillings. A pinch of salt elevates the overall taste and adds depth to the flaky layers.
-
Sugar: While not always essential, sugar lends a subtle sweetness to the crust, enhancing its appeal and promoting browning. A touch of sugar transforms your crust into a golden masterpiece.
-
Fat: This key ingredient shortens the gluten in the flour, resulting in a tender and flaky texture. Whether you choose cold butter, shortening, or a combination of both, its incorporation into the dry ingredients is paramount.
-
Water: The lifeblood of your pie crust, water hydrates the other ingredients and enables them to form a cohesive dough. Add water gradually to achieve the ideal consistency, ensuring a workable dough that’s neither too wet nor too dry.
Essential Tools: The Culinary Arsenal for Pie-Making Excellence
-
Measuring Cups and Spoons: Precision is key in baking, and these tools ensure accurate measurements of every ingredient. Trustworthy measuring devices will guide you towards a perfectly balanced crust.
-
Mixing Bowls: Ample space is essential for effortlessly combining all the ingredients. Choose bowls that accommodate the volume of your dough and provide ample room for mixing.
-
Pastry Cutter or Two Forks: These implements are your weapons in the battle against gluten. They cut cold butter or shortening into the flour mixture, creating the crumbly texture that defines a flaky crust.
-
Rolling Pin: This indispensable tool flattens your dough to the desired thickness, ensuring even cooking and a uniform bake. A smooth, even rolling action is crucial for achieving the perfect crust.
-
Pie Plate: The vessel that holds your culinary masterpiece, a pie plate provides support to the crust and contains the filling. Choose a plate that’s the right size for your crust and complements the shape of your pie.
-
Fork or Pastry Brush: These tools serve as your creative canvas, sealing the edges of the crust and creating a decorative finish. A well-sealed edge prevents leaks and adds a touch of flair to your pie.
Essential Techniques: Mastering the Art of Pie-Making
-
Cutting In: This technique incorporates fat into the flour mixture, creating a crumbly texture. Use a pastry cutter or two forks to achieve the desired consistency without overworking the dough.
-
Rolling: The art of flattening the dough evenly ensures a uniform thickness, promoting even cooking and preventing burnt or undercooked areas. Roll gently and gradually to avoid tearing the dough.
-
Crimping: This decorative and functional technique seals the edges of your crust together. Pinch the edges or use a fork to create a tight seal, preventing leaks and adding a rustic charm.
Bench Scraper: Your Culinary Ally in Pie-Making Perfection
A bench scraper, with its flat, rigid blade, is an invaluable tool for cutting and shaping your dough. It cleanly separates dough from work surfaces, prevents sticking, and aids in shaping the crust into a perfect circle.
Essential Pie-Making: A Comprehensive Guide from Ingredients to Techniques
When it comes to the culinary art of baking, nothing quite compares to the allure of a homemade pie. Whether you prefer sweet or savory, a well-crafted pie crust is the key to success. In this comprehensive guide, we’ll embark on a journey through the essential ingredients, tools, and techniques that will empower you to bake a perfect pie crust every time.
Essential Ingredients
The foundation of any great pie crust lies in the careful selection of high-quality ingredients. The key players include:
- Flour: The backbone of the crust, providing structure and texture.
- Salt: Enhances flavor balance, preventing the sweetness of the filling from overpowering the crust.
- Sugar: Adds a touch of sweetness and promotes browning.
- Fat: Shortens the gluten strands in the flour, creating the flaky, tender texture we all crave.
- Water: Hydrates the ingredients, allowing them to form a cohesive dough.
Essential Tools
To elevate your pie-making game, you’ll need an arsenal of trusted tools. Gather these essential items:
- Measuring cups and spoons: Guarantee precise measurements for consistent results.
- Mixing bowls: Provide ample space for mixing and combining ingredients.
- Pastry cutter or two forks: Cut cold butter or shortening into the flour mixture, creating the crumbly texture that’s key to a flaky crust.
- Rolling pin: Rolls out the dough to a uniform thickness, ensuring even cooking.
- Pie plate: The vessel that holds your crust and filling, ready to be transformed into a culinary masterpiece.
- Fork or pastry brush: Seal the edges of the crust together securely, preventing leaks and adding a decorative touch.
Essential Techniques
Mastering a few essential techniques is the key to unlocking the secrets of pie-making. Follow these steps:
- Cutting in: This technique incorporates the fat into the flour mixture, creating a crumbly texture.
- Rolling: Flatten the dough to a uniform thickness, ensuring even cooking.
- Crimping: Seal the edges of the crust together, preventing leaks and creating a decorative edge.
- Blending: Mix the ingredients together thoroughly until evenly distributed.
- Shaping: Form the dough into a pie crust, either by hand or using a mold.
Useful Tools and Tips
Elevate your pie-making experience with these helpful tools and tips:
- Bench scraper: Use this handy tool to cut and shape the dough with ease.
- Plastic wrap: Wrap the dough in plastic wrap and chill it in the refrigerator. This prevents the dough from drying out while chilling, which makes it easier to handle and roll out.
- Chiller or refrigerator: Cooling the dough before rolling it out helps prevent shrinkage and tearing.
- Oven: Bake the pie crust until it is golden brown and cooked through. Keep an eye on the crust to ensure it doesn’t overcook.
- Pie filling: The heart of your pie, providing flavor and texture. Choose a filling that complements your crust and satisfies your taste buds.
The Magic Ingredients and Tools for Perfect Pie Crusts
Pie baking is an art form, and like any art, it requires the right ingredients and techniques. For the perfect pie crust, you’ll need more than just flour, water, and a can of fruit filling. Let’s dive into the essential ingredients, tools, and techniques to elevate your pies to culinary masterpieces.
Essential Ingredients
The foundation of a great pie crust lies in its ingredients. Here are the key players:
- Flour: Provides structure and texture, forming the crust’s backbone.
- Salt: Enhances flavor and balances the sweetness of fillings, preventing blandness.
- Sugar: Adds sweetness and helps the crust brown beautifully.
- Fat: Shortens gluten in the flour, contributing to flakiness and tenderness.
- Water: Hydrates the ingredients, enabling them to bind together into a cohesive dough.
Must-Have Tools
To craft a perfect pie crust, you’ll need the right tools in your arsenal:
- Measuring cups and spoons: Precision is key for exact ingredient proportions.
- Mixing bowls: Provide ample space for mixing and combining ingredients.
- Pastry cutter or two forks: Cut cold butter or shortening into the flour mixture, creating crumbly bits.
- Rolling pin: Flattens the dough to a uniform thickness, ensuring even cooking.
- Pie plate: Holds the crust and filling, creating the perfect vessel for your culinary creation.
- Fork or pastry brush: Seals the edges of the crust, preventing leaks and adding a decorative touch.
Essential Techniques
Mastering these techniques will transform your pie crust into a culinary showstopper:
- Cutting in: Incorporate fat into the flour mixture, creating a crumbly texture that melts during baking.
- Rolling: Flatten the dough to a uniform thickness, ensuring even cooking and a crisp crust.
- Crimping: Seal the edges of the crust together, preventing leaks and adding a decorative flair.
- Blending: Mix the ingredients until they’re evenly distributed, ensuring a consistent texture.
- Shaping: Form the dough into a pie crust, either by hand or using a mold, creating the perfect vessel for your fillings.
Useful Tips and Tools
To take your pie crusts to the next level, consider these tips and tools:
- Bench scraper: Cut and shape the dough with ease.
- Plastic wrap: Chill the dough to prevent drying and make it easier to handle.
- Refrigerator or chiller: Cool the dough, making it less sticky and easier to roll out.
- Oven: Bake the pie crust until golden brown and cooked through, creating the perfect vessel for your culinary creation.
- Pie filling: The heart of the pie, providing flavor and texture, whether it’s fruit, cream, or savory delights.
Embark on this culinary adventure with the right ingredients, tools, and techniques, and your pie crusts will become the talk of every gathering. Happy baking!
The Art of Pie Crust: A Culinary Odyssey
Embarking on the culinary adventure of crafting the perfect pie crust is a journey that requires meticulously chosen ingredients and deft techniques. As we delve into the secrets of this culinary masterpiece, let us first gather the essential tools of the trade.
Essential Ingredients: The Foundation of Flavor
Like the canvas upon which an artist paints their masterpiece, flour, salt, sugar, fat, and water form the foundation of a pie crust. Flour provides structure and texture, salt enhances flavor and balances sweetness, sugar adds a touch of sweetness and assists in browning, while fat creates the coveted flaky, tender texture. Water hydrates the ingredients, enabling them to coalesce into a pliable dough.
Essential Tools: Your Culinary Companions
The right tools can elevate the pie-making experience, ensuring precise measurements and effortless execution. Precise measuring cups and spoons ensure the perfect balance of ingredients. Spacious mixing bowls provide ample room for combining and blending. Pastry cutters or forks deftly cut butter or shortening into the flour mixture, while a rolling pin evenly flattens the dough. A pie plate serves as the vessel for your culinary creation, and a fork or pastry brush seals and decorates the edges.
Essential Techniques: The Secrets of a Masterpiece
Mastering the essential techniques is paramount to achieving pie crust perfection. Cutting in carefully incorporates fat into the flour, creating a crumbly foundation. Precise rolling ensures uniform thickness for even cooking. Crimping effectively seals the crust, preventing leaks and adding a decorative touch. Blending evenly distributes ingredients, while shaping transforms the dough into the desired pie crust form.
Useful Tools and Tips: Enhance Your Pie-Making Journey
While the essential tools and ingredients form the core of pie crust creation, certain additional tools and tips can elevate your experience. A bench scraper aids in cutting and shaping the dough, while plastic wrap chills it, preventing drying. A chiller or refrigerator further enhances dough handling and rolling. Ultimately, the oven transforms your creation into a golden-brown masterpiece, its heat gently coaxing the crust to perfection.
The Heart of the Pie: Filling and Flavor
No pie is complete without its enticing filling, the delectable heart that provides flavor, texture, and soul. Whether sweet or savory, tangy or mild, the filling complements the crust, creating a harmonious symphony of flavors. From the creamy embrace of custard to the fruity burst of berries, the filling breathes life into your culinary endeavor.
The art of pie crust creation is a culinary odyssey, each step leading closer to a delectable masterpiece. By carefully selecting ingredients, mastering essential techniques, and utilizing the right tools, you can transform simple ingredients into a flaky, golden-brown marvel. Whether gracing the table for a special occasion or cozying up on a chilly evening, a homemade pie crust is a testament to your culinary artistry and brings joy to every bite. So let us embark on this culinary adventure together, unlocking the secrets of the perfect pie crust and creating memories that will forever linger in the hearts and taste buds of our loved ones.
The Art of Crafting a Pie Crust: A Culinary Symphony
In the realm of baking, few culinary creations evoke as much comfort and nostalgia as a freshly baked pie. At the heart of every delectable pie lies a flaky, golden-brown crust that serves as a vessel for a myriad of delectable fillings.
Essential Ingredients: The Foundation of Pie Crust Perfection
Just as a painter’s canvas sets the stage for their masterpiece, the ingredients for a pie crust lay the foundation for its texture and flavor. Flour provides the structure, while salt enhances the flavors and balances the sweetness of fillings. Sugar adds a touch of sweetness and helps the crust caramelize during baking. The incorporation of fat, whether butter or shortening, is crucial for creating a flaky texture by inhibiting the formation of gluten in the flour. Last but not least, water hydrates the ingredients and allows them to form a pliable dough.
Essential Tools: Orchestrating the Perfect Pie Crust
Just as a conductor relies on their orchestra, a baker requires the right tools to craft a flawless pie crust. Measuring cups and spoons ensure precise ingredient ratios. Mixing bowls provide ample space for combining ingredients, while a pastry cutter or two forks skillfully cut cold butter or shortening into the flour mixture. A rolling pin flattens the dough to the desired thickness, and a pie plate cradles the crust and its precious filling. Finishing touches are achieved with a fork or pastry brush for sealing the edges and adding decorative flourishes.
Essential Techniques: Mastering the Art of Pie Crust Magic
The techniques employed in crafting a pie crust are no less important than the ingredients and tools. Cutting in the fat creates a crumbly texture that will yield a flaky crust upon baking. Rolling the dough to a uniform thickness ensures even cooking. Crimping the edges not only seals the crust but also adds an aesthetic touch. Blending the ingredients until evenly distributed guarantees a smooth and cohesive crust. Finally, shaping the dough into a pie crust is a testament to the baker’s precision and skill.
Useful Tools and Tips: Enhancing Your Pie Crust Creation
Beyond the essentials, several useful tools and tips can elevate your pie crust endeavors. A bench scraper aids in cutting and shaping the dough. Plastic wrap keeps the dough chilled and prevents it from drying out. A chiller or refrigerator cools the dough, making it more manageable and easier to roll out. An oven is indispensable for baking the pie crust until it achieves a golden-brown hue and cooked-through perfection. And of course, your choice of pie filling will determine the flavor and texture of your culinary masterpiece.
Remember, the creation of a perfect pie crust requires a harmonious blend of precise measurements, meticulous techniques, and a touch of artistry. With practice and patience, you can master this culinary symphony and delight in the fruits of your labor—a flaky, golden-brown crust that will elevate the flavors of any filling you choose.
