Architectural Trim: Definition, Types, Functions, And Installation
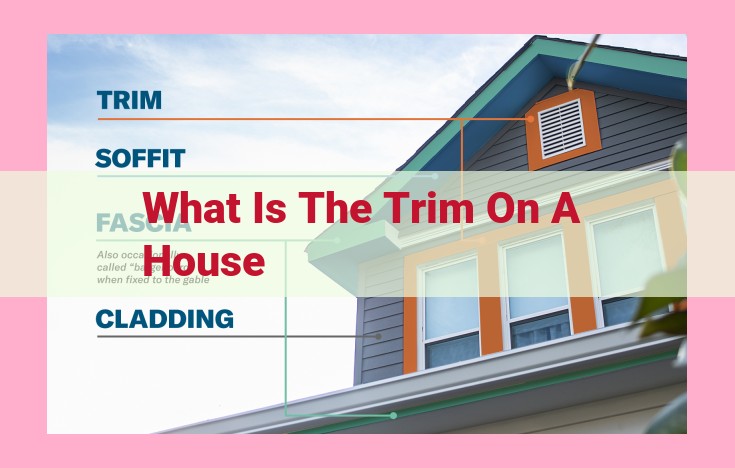
Trim refers to the decorative and functional elements added to the exterior or interior of a house. It encompasses various materials, styles, and functions, including moldings, cornices, baseboards, and casings. Architectural trim enhances the aesthetics of a space, conceals imperfections, and provides protection against damage. Its installation requires precision to ensure proper alignment and durability, contributing significantly to the overall design and character of a building.
Architectural Trim: The Essence of Architectural Detail
In the symphony of architectural design, trim plays an integral role as the delicate brushstrokes that define and elevate a space. From ornate crown moldings to sleek baseboards, trim adds visual interest, texture, and functionality to any room.
Types and Functions
The plethora of trim options available allows architects and designers to tailor each space to its unique character and purpose. Crown molding, for instance, frames the ceiling and adds a touch of elegance, while baseboards conceal the junction between the floor and wall, protecting against damage. Casings around windows and doors provide a sophisticated finish and enhance their architectural appeal.
Materials and Durability
Trim can be crafted from a range of materials, each with its own distinct properties. Wood, a timeless classic, offers warmth and versatility, while MDF (medium-density fiberboard) provides a more economical and durable option. Polyurethane and PVC, on the other hand, are moisture-resistant and easy to maintain. The choice of material depends on the desired aesthetic, durability requirements, and budgetary constraints.
Styles and Architectural Influences
Trim styles can evoke different architectural eras and influences. Traditional molding profiles, such as egg-and-dart and ogee, reflect the opulence of the Georgian and Victorian periods. Streamlined, minimalist trims are reminiscent of modernist architecture, while rustic styles with rough-hewn edges complement contemporary industrial settings.
Materials: Durability and Versatility in Trim
The choice of material for your architectural trim plays a crucial role in its durability, functionality, and aesthetic appeal. Here’s a comprehensive guide to help you navigate the diverse materials available:
Wood:
- Pros: Timeless beauty, warmth, and versatility. Can be painted or stained to match any décor.
- Cons: Requires regular maintenance, susceptible to moisture and pests.
PVC (Polyvinyl Chloride):
- Pros: Affordable, waterproof, and resistant to warping. Available in various colors and finishes.
- Cons: Not as durable as wood, can be susceptible to heat damage.
MDF (Medium Density Fiberboard):
- Pros: Smooth surface, can be painted or covered in veneer to mimic wood. Moisture-resistant.
- Cons: Not as strong as solid wood, susceptible to water damage if not properly sealed.
Polystyrene:
- Pros: Lightweight, easy to install, and budget-friendly.
- Cons: Not as durable as other materials, can be easily damaged.
Metal:
- Pros: Highly durable, fire-resistant, and low maintenance. Available in a range of finishes, including aluminum, copper, and steel.
- Cons: Can be expensive, prone to scratches and dents.
Fiberglass:
- Pros: Extremely durable, moisture-resistant, and fire-retardant. Can be molded into intricate designs.
- Cons: More expensive than other materials, requires specialized tools for installation.
By considering the specific requirements of your project, you can select the material that best balances durability, functionality, and style. Remember, the choice of trim material is not merely an aesthetic decision but also a testament to the longevity and performance of your architectural detailing.
Styles: Embracing Architectural History Through Trim
Throughout history, architectural trim has played a pivotal role in shaping the aesthetics and character of buildings. From the ornate moldings of ancient Greece to the minimalist lines of contemporary design, trim has evolved alongside architectural styles, reflecting the values and aspirations of each era.
Classical Influence
Greek and Roman architecture introduced elaborate trim to their buildings, using cornices, pediments, and pilasters to create a sense of order and grandeur. Fluted columns and carved friezes adorned temples, conveying the power and elegance of classical civilization.
Gothic Revival
The Gothic revival of the 19th century saw a resurgence of intricate trim, inspired by medieval cathedrals. Pointed arches, ribbed vaults, and lancet windows were adorned with foliage, grotesques, and heraldic devices. This intricate trim evoked the spirituality and mystery of the Middle Ages.
Victorian Era
The Victorian era witnessed an explosion of styles, including the Gothic revival, Italianate, and Second Empire. Trim became more elaborate and ornamental, featuring heavy moldings, balustrades, and gingerbread fretwork. Bay windows and porches were often adorned with lacy trim, adding a touch of frivolity and charm.
Arts and Crafts Movement
In response to the excesses of the Victorian era, the Arts and Crafts movement advocated for simplicity and natural materials. Trim became more understated, emphasizing clean lines and handcrafted details. Wooden beams, stone lintels, and wrought iron hinges adorned houses, creating a warm and inviting atmosphere.
Modernism
The modernist movement of the 20th century rejected ornamentation in favor of functionality. Trim was reduced to simple bands and recesses, emphasizing the geometric forms and clean lines of buildings. Metal, glass, and concrete replaced traditional materials, creating a sleek and contemporary aesthetic.
By embracing the diverse styles of trim throughout history, architects and homeowners alike can evoke different eras and architectural influences, creating buildings that tell the story of our shared cultural heritage.
Functions: Beyond Aesthetics, the Practicality of Trim
Architectural trim, often overlooked in design, possesses a multitude of practical benefits that extend beyond mere aesthetics. It serves as a guardian, protecting structural elements from wear and tear, shielding walls and corners from bumps and bruises. Its concealing powers are equally impressive, hiding unsightly gaps, imperfections, and transitions between different materials.
But trim’s functionality doesn’t end there. It also serves as an architectural enhancer, accentuating key features and creating visual interest. By adding depth and dimension to walls, ceilings, and openings, trim transforms ordinary spaces into captivating environments.
For instance, baseboards not only cover the joint between wall and floor but also prevent dirt and moisture from entering. Crown moldings, placed at the intersection of wall and ceiling, conceal imperfections while adding a touch of elegance. Window and door trims, by framing these openings, accentuate their architectural significance.
Moreover, trim plays a crucial role in insulation. Properly installed trim prevents heat loss around windows and doors, contributing to energy efficiency. It can also reduce noise transmission between rooms, creating a more peaceful and tranquil interior.
In conclusion, architectural trim is not just a decorative element; it fulfills a range of essential functions that enhance the durability, aesthetics, and comfort of a space. By understanding its practical benefits, homeowners and designers can harness the full potential of trim to create beautiful and functional interiors.
Installation: The Art of Precision in Trim
The meticulous placement of trim is an artisanal touch that adds character and definition to any space. Installation requires patience, precision, and an eye for detail to ensure a seamless and visually appealing result.
Materials and Tools
The first step is to gather the necessary materials and tools. “Nails” and “screws are the primary fasteners for trim, with the choice depending on the material and application. A nail gun or hammer will be needed for nails, while a screw gun or screwdriver is required for screws. Additionally, a miter saw will be essential for cutting the trim pieces at precise angles.
Measuring and Cutting
Before installing the trim, it’s imperative to measure the areas where it will be placed. Accuracy is crucial to avoid gaps or misaligned pieces. Use a tape measure to determine the length and angles of the trim, then mark them on the surface.
Next, set up your miter saw at the appropriate angles and carefully cut the trim pieces. Clean cuts will produce a professional-looking finish and minimize the need for touch-ups.
Fastening the Trim
Start by attaching the trim pieces at the corners or ends of the surface. Use a nail gun or hammer to drive nails or screws into the trim at an angle, ensuring they are flush with the surface. Avoid over-driving the fasteners, as this can damage the trim.
Continue working your way around the perimeter, attaching the trim securely and evenly. Check for gaps and adjust the placement as needed. For longer pieces, it may be beneficial to use a level to ensure they are straight.
Finishing Touches
Once the trim is installed, conceal the nail or screw heads. Wood filler or caulk can be used to fill in the gaps and create a smooth, seamless appearance. Allow the filler or caulk to dry completely before sanding it flush with the trim surface.
Painting or staining the trim is the final step. Choose the color and finish that best complements the space and your desired aesthetic. Use a brush or roller to apply the paint or stain evenly, making sure to cover all surfaces. Allow the finish to cure completely before enjoying the transformed look of your space.
