Comprehensive Amaryllis Care Guide: Thriving Blooms And Year-Round Beauty
To ensure thriving amaryllis, provide ample bright indirect light. Water thoroughly when the top inch of soil feels dry, but avoid overwatering. Fertilize every 2-3 weeks with a balanced fertilizer. Maintain a temperature range of 60-70°F (16-21°C) and increase humidity by misting or using a humidifier. Other essential elements include choosing the right pot size, well-draining soil, and planting the bulb at the correct depth. Regularly cut back spent flower stalks and provide a rest period to rejuvenate the plant.
Light: The Essential Element for Thriving Amaryllis
Embrace the Sun’s Embrace
For amaryllis to flourish, it craves the radiant embrace of the sun. Position your beloved plant where it can bask in bright, indirect light for at least 6 hours daily. Think of a sunny windowsill or a spot near a south-facing window, where the gentle rays will gently kiss its petals.
Duration and Intensity
The duration and intensity of light play a pivotal role in amaryllis‘ growth. Aim for long days of bright illumination during its active growing season. As the days shorten in autumn, gradually reduce the light exposure to signal the approach of its rest period.
Strategic Placement
Choose a location where amaryllis can revel in evenly distributed light without being subjected to harsh, direct sunlight. The scorching rays can scorch its delicate leaves and hinder its blooms. East- or west-facing windows often provide an optimal balance of light and shade.
Water: The Elixir of Life for Thriving Amaryllis
Water is the lifeblood of your amaryllis, as it carries essential nutrients that fuel its growth and development. The key to proper watering lies in understanding the unique needs of your plant at different stages of its life cycle.
Watering During Active Growth:
When your amaryllis is actively growing, its thirst for water is at its peak. You’ll want to provide it with a consistently moist soil environment. Allow the top inch or two of soil to dry slightly between waterings to prevent waterlogging. This allows for proper oxygenation of the roots, which is crucial for healthy growth.
Determining Soil Moisture:
- Touch Test: Dip your finger into the soil. If it feels dry to the touch, your plant needs watering.
- Moisture Meter: A moisture meter can provide a more precise measurement of soil moisture levels. Aim for a reading between 3 and 4 for ideal soil moisture.
Watering Method:
- From Below: Water from the bottom by placing the pot in a dish or tray filled with water. This allows the soil to soak up the moisture gradually, minimizing the risk of overwatering.
- Top Watering: If you choose to water from the top, use a watering can with a gentle shower head. Water slowly and evenly until the water drains out the drainage holes.
Adjusting for Pot Size and Growth Stage:
- Larger Pots: Plants in larger pots require more water than those in smaller pots.
- Growth Stage: During periods of rapid growth, such as when the flower stalk is emerging, water more frequently. Reduce watering as the plant matures.
Fertilizer for Thriving Amaryllis
Amaryllis’s Nutritional Needs
Amaryllis, with their captivating blooms, are a gardener’s delight. To ensure their optimal growth and vibrant blossoms, proper fertilization is essential. These bulbs are heavy feeders, requiring a nutrient-rich diet to support their robust growth and spectacular blooms.
Choosing the Right Fertilizer
The ideal fertilizer for amaryllis is a balanced blend containing nitrogen (N), phosphorus (P), and potassium (K). Look for a fertilizer with an N-P-K ratio of around 10-10-10 or 12-12-12. This ratio provides the necessary nutrients for healthy growth and abundant blooms.
Frequency of Fertilization
During the active growing season, fertilize amaryllis every 2-3 weeks. This regular feeding replenishes the soil with essential nutrients and supports the plant’s rapid growth. As the plant matures and blooms, reduce the frequency of fertilization to monthly.
Application Methods
There are two common methods for applying fertilizer to amaryllis:
- Liquid Fertilizer: Dilute the fertilizer according to the manufacturer’s instructions and apply it to the soil. Water the plant thoroughly after application.
- Granular Fertilizer: Sprinkle the granular fertilizer around the base of the plant, avoiding direct contact with the bulb. Water the plant to dissolve the fertilizer.
Avoid Over-Fertilization
While amaryllis appreciate regular fertilization, it’s crucial to avoid over-fertilizing. Excessive fertilizer can damage the roots and burn the plant. Always follow the instructions on the fertilizer label carefully.
Fertilization Tips
- Fertilize after watering: This helps prevent root burn.
- Avoid fertilizing in extreme temperatures.
- Discontinue fertilization during the rest period: Amaryllis need a period of dormancy to rejuvenate.
- Consider using an organic fertilizer: Organic fertilizers release nutrients slowly over time, reducing the risk of over-fertilization.
Temperature: The Pivotal Factor for Thriving Amaryllis
Temperature plays a crucial role in the growth and development of amaryllis, affecting everything from bulb formation to flower production. Ensuring optimal temperature conditions is paramount for healthy and vibrant plants.
During the active growth period, amaryllis prefers warm temperatures between 65-80°F (18-27°C). This warmth stimulates the development of healthy bulbs, strong stems, and vibrant blooms. When temperatures dip below 60°F (15°C), growth is stunted and flowering may be delayed or reduced.
Conversely, excessive heat above 85°F (29°C) can also be detrimental to amaryllis. Heat stress can scorch leaves, weaken plant tissues, and reduce bulb production. If temperatures rise sufficiently high, the plant may even go dormant.
During the resting period, amaryllis requires cooler temperatures between 45-55°F (7-13°C). This cooler environment helps the bulbs to rejuvenate and accumulate energy for the next growing season. A rest period of approximately 8-12 weeks is generally recommended.
Maintaining consistent temperatures throughout the entire growth cycle is essential for thriving amaryllis. Avoid sudden temperature fluctuations, as these can stress the plants and potentially damage their health. By providing the right temperature conditions, you can ensure that your amaryllis will flourish and bring joy to your home with their stunning blooms.
The Surprisingly Vital Role of Humidity for Thriving Amaryllis
Amaryllis, known for their majestic blooms, thrive in environments that mimic their native habitat. Humidity, an often-overlooked factor, plays a pivotal role in ensuring the well-being of these captivating plants.
Just like us, amaryllis plants appreciate a humid environment. It allows them to absorb moisture through their leaves, supplementing the water they receive from their roots. Similar to a spa treatment for your skin, humidity helps amaryllis plants stay hydrated and prevents their leaves from becoming crispy and brown.
Low humidity, on the other hand, can create a desert-like environment that stresses amaryllis plants. Their leaves become vulnerable to curling, wilting, and even dropping, signaling their distress.
Maintaining optimal humidity levels for amaryllis is crucial for their health and happiness. Here are some simple methods to ensure your amaryllis thrives in a humid oasis:
-
Misting: Use a spray bottle to gently mist the leaves of your amaryllis regularly. This quick misting provides a refreshing boost of humidity that your plant will appreciate.
-
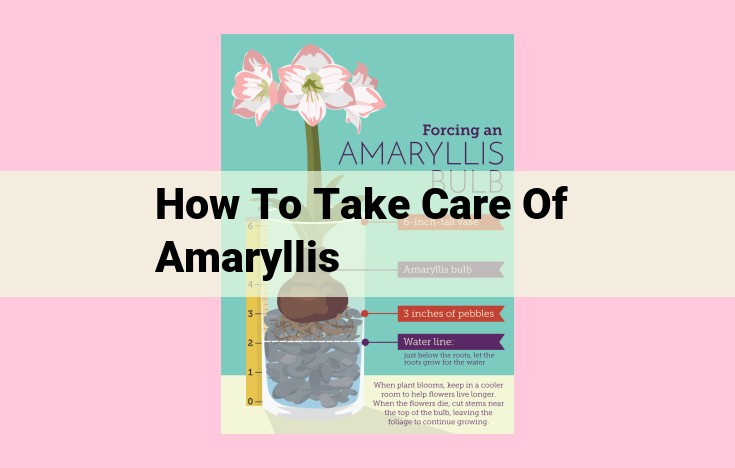
Pebble Tray: Fill a shallow tray with pebbles and water. Place your amaryllis pot on top of the pebbles. As the water evaporates, it will create a mini-humidifier that benefits your plant.
-
Humidifier: For a more efficient and long-lasting solution, consider investing in a humidifier. This device releases moisture into the air, creating a more favorable environment for your amaryllis.
Pot Size: A Crucial Element for Amaryllis Thriving
When it comes to nurturing amaryllis, selecting the right pot size plays a pivotal role in ensuring optimal growth and development. This elegant bulbous plant requires a pot that strikes a delicate balance between accommodating its root system and providing adequate support.
Assessing Bulb Size
The size of your amaryllis bulb should serve as your primary guide when choosing a pot. Smaller bulbs, typically measuring around 2-4 inches in diameter, will be comfortable in a 6-inch pot. Larger bulbs, ranging from 4-6 inches in diameter, demand a roomier environment and will thrive in an 8-inch pot.
Root Space vs. Stability
While ample space for root expansion is crucial, it’s equally important to avoid an excessively large pot. Too much empty space can lead to waterlogging and root rot. On the flip side, a pot that’s too small will restrict root growth and result in stunted plants.
Drainage Benefits
Exceptional drainage is paramount for amaryllis, as soggy soil can quickly lead to health issues. Opt for pots with drainage holes that allow excess water to escape freely. Ensuring proper drainage also helps regulate soil moisture levels, preventing both drought and waterlogging.
Choosing the Material Wisely
The material of your pot is another consideration. Porous materials, such as terracotta or clay, allow for better aeration and moisture evaporation, making them ideal for amaryllis. However, non-porous materials like plastic or glazed ceramic retain moisture more effectively, which may require more diligent watering practices.
Planting Perfection
When planting your amaryllis bulb, position it with the pointed end facing up and about one-third of the bulb exposed above the soil surface. This allows for proper root development and prevents the bulb from rotting.
By carefully selecting a pot that meets the specific needs of your amaryllis bulb, you can lay the foundation for vibrant growth and captivating blooms.
The Secret Sauce for Thriving Amaryllis: Mastering Soil Composition and Drainage
The journey to nurturing magnificent amaryllis begins with providing them with the perfect culinary concoction—the right soil. Just as a master chef carefully selects the freshest ingredients for a delectable dish, creating the ideal soil foundation is paramount for the blossoming brilliance of these captivating plants.
The ideal soil for amaryllis is a well-draining symphony that allows excess moisture to gracefully depart while retaining just enough for the plant’s nourishment. It mimics the natural havens where amaryllis thrive in the wild—rocky terrains with impeccable drainage.
To achieve this soil masterpiece, we employ a well-balanced blend. Compost contributes organic matter, enriching the soil with vital nutrients. Perlite and pumice, like tiny volcanic bubbles, promote drainage and aeration, ensuring roots can dance freely without suffocating.
Fast-draining soil is imperative to prevent root rot, a common malady that arises from soggy conditions. When water pools around the roots, it impedes their ability to absorb oxygen, leading to a decline in plant health.
The ideal pH range for amaryllis soil lies between 6.0 and 6.5, ensuring the plant can efficiently access essential nutrients. This neutral to slightly acidic environment mimics their natural habitat and supports their thriving growth.
By providing amaryllis with the perfect soil symphony, we not only nurture their blossoming beauty but also lay the foundation for a healthy and vibrant life. Just as a chef takes pride in their culinary creations, let us take pleasure in crafting the perfect soil masterpiece for our beloved amaryllis.
Planting Depth: The Key to Thriving Amaryllis
The Right Depth: A Crucial Element for Amaryllis Success
When it comes to nurturing Amaryllis, the depth at which you plant the bulbs is of utmost importance. This remarkable flower, known for its captivating blooms, requires precise placement to flourish. Planting too deeply or too shallowly can hinder growth, leading to stunted or weak plants. By understanding the optimal depth and adhering to it, you can unlock the true potential of your Amaryllis, ensuring vibrant blooms and lasting beauty.
Buried Treasures: The Benefits of Correct Depth
Planting Amaryllis bulbs at the correct depth offers several advantages:
- Enhances Root Development: Optimal depth allows the roots to establish firmly, accessing essential nutrients and water from the soil.
- Supports Sturdiness: Proper depth provides support to the growing plant, preventing it from toppling over and ensuring a strong, upright growth habit.
- Protects from Environmental Stresses: The appropriate depth helps protect the bulbs from extreme temperatures and fluctuations in soil moisture.
Measuring the Perfect Depth
To determine the correct depth for planting your Amaryllis bulbs, follow these simple steps:
- Estimate Bulb Height: Measure the height of the bulb from its base to its tip.
- Mark the Depth: Double the bulb height to obtain the ideal planting depth. For example, if the bulb is 2 inches tall, plant it 4 inches deep.
- Prepare the Hole: Dig a hole in the soil twice the height of the bulb. Place a small amount of potting mix at the bottom to provide a cushion.
Setting the Bulbs in Place
Once you have dug the hole to the appropriate depth, carefully place the Amaryllis bulb in the center. Ensure that the pointed end is facing upward. Gently fill in the soil around the bulb, leaving the top third of the bulb exposed above the soil surface.
Nurturing Success
With your Amaryllis bulbs planted at the correct depth, you have laid the foundation for their thriving growth. Remember to provide ample sunlight, well-drained soil, and regular watering. Soon, you will witness the enchanting sight of magnificent blooms, a testament to your careful attention to detail. So, embrace this essential element of Amaryllis cultivation, for it holds the key to unlocking the full potential of these captivating plants.
Cutting Back Flower Stalk: The Secret to Encouraging Amaryllis Regrowth
Amaryllis are magnificent blooms that bring a touch of elegance to any home. However, after their stunning flowers fade, it’s essential to take proper care to ensure future growth and vibrant blooms. Cutting back the spent flower stalk is a crucial step in this process.
When the amaryllis flower stalk wilts and turns brown, it’s time to remove it. Do not cut the entire plant down to the ground. Instead, gently twist the stalk at its base and pull it away from the bulb. This helps to prevent rot and preserves the plant’s energy for new growth.
By removing the spent flower stalk, you encourage the amaryllis to focus its efforts on developing new bulbs and leaves. The plant will naturally start to store nutrients in the bulb during this time, preparing for the next blooming season.
If you neglect to cut back the flower stalk, the plant may continue to put energy into maintaining the dead stalk instead of directing it towards new growth. This can weaken the plant and potentially reduce the number and quality of future blooms.
By following this simple step, you can ensure that your amaryllis stays healthy and continues to produce beautiful flowers for years to come. Remember, cutting back the flower stalk is not just a maintenance task but an essential part of the plant’s natural cycle.
Establishing a Rest Period for Amaryllis Rejuvenation
After the amaryllis has graced your home with its stunning blooms, it’s time to give it a well-deserved rest period. This is crucial for the plant’s health and future blooming ability.
Step 1: _Allow Natural Decline:_
As the flowers start to fade, stop watering your amaryllis gradually. Allow the leaves to yellow and naturally decline. This process can take several weeks.
Step 2: _Cut Back and Dry:_
Once the leaves are completely dry, carefully cut them back to about 2-3 inches above the bulb. Place the bulb in a cool, dry location with good ventilation.
Step 3: _Cool and Dark Storage:_
Store the bulb in a paper bag or box at temperatures around 50-60°F (10-16°C). Avoid exposing it to direct sunlight or moisture.
Step 4: _Rest Duration:_
The rest period should last for 8-12 weeks. Check the bulb occasionally to ensure it remains firm and doesn’t shrivel.
Step 5: _Rehydration and Replanting:_
After the rest period, prepare to rehydrate and replant the bulb. Soak the bulb in lukewarm water for several hours before planting it in fresh, well-draining soil.
Step 6: _New Growth:_
In a few weeks, you should see new growth emerging from the bulb. Once the leaves are established, gradually increase watering and provide bright, indirect sunlight.
By following these steps, you can successfully give your amaryllis a rest period, promoting its overall health and setting it up for another season of spectacular blooms.
Repotting Amaryllis: A Step-by-Step Guide
When to Repot
- Repot annually during the resting period, typically after the foliage has died back.
- If the pot is too small or roots are growing out of the drainage holes, repot sooner.
Materials You’ll Need
- New pot slightly larger than the old one, with drainage holes
- Fresh well-draining potting mix
- Trowel or spoon for scooping
Step 1: Choose the Right Pot
- Select a pot that is 2-3 inches wider than the bulb’s diameter.
- Ensure the pot has ample drainage holes to prevent waterlogging.
Step 2: Prepare the Potting Mix
- Use a commercial potting mix specifically designed for bulbs.
- If desired, add perlite or sand to improve drainage.
Step 3: Remove the Amaryllis Bulb
- Gently tap the old pot upside down to loosen the soil.
- Remove the amaryllis bulb carefully.
Step 4: Inspect the Bulb
- Examine the bulb for any signs of damage or disease.
- If necessary, remove any damaged areas with a sharp knife.
Step 5: Plant the Bulb
- Position the bulb in the center of the new pot.
- Cover the top third of the bulb with potting mix.
- Firm down the soil gently around the bulb.
Step 6: Water and Fertilize
- Water the amaryllis thoroughly after repotting.
- Fertilize with a balanced fertilizer, according to the package instructions.
Tips
- Handle the bulb with care to avoid damage.
- Space bulbs several inches apart in large pots.
- Use a potting stick to create a hole for the bulb, preserving the root system.
Pests:
- Aphids: Describe the symptoms and provide control measures.
- Mealybugs: Explain the infestation signs and suggest eradication methods.
Pests: Amaryllis’ Unwelcomed Guests
Every gardener faces the occasional pest problem, and amaryllis is no exception. These vibrant blooms can fall victim to two common pests: aphids and mealybugs.
Aphids: Tiny Green Invaders
Aphids are small, soft-bodied insects that come in a range of colors, including green, yellow, or brown. They’re notoriously sap-suckers, piercing amaryllis leaves and stems to feed. This can lead to stunted growth, yellowing leaves, and, in severe cases, plant death.
Mealybugs: White, Cottony Interlopers
Mealybugs are another common pest of amaryllis. These tiny, cottony-looking insects produce a sticky substance called honeydew that can attract other pests and promote fungal growth. Mealybugs feed on amaryllis leaves and stems, damaging the plant’s health and appearance.
Control Measures: A Gardener’s Arsenal
To protect your amaryllis from these unwelcome invaders, take swift action. Here are some effective control measures:
- Inspect Plants Regularly: Keep an eye out for pests by inspecting amaryllis plants thoroughly, especially on the undersides of leaves.
- Manually Remove Aphids: Simply dab aphids with a cotton swab dipped in rubbing alcohol to kill them.
- Natural Remedies for Aphids: Spray amaryllis plants with a solution of water mixed with insecticidal soap or neem oil.
- Eradicating Mealybugs: Remove mealybugs with a cotton swab dipped in rubbing alcohol or spray with a horticultural oil-based insecticide.
- Preventive Measures: Keep the garden area clean of weeds and debris to reduce pest hiding places.
Amaryllis Care Guide: Thriving in Your Home
Essential Elements for Thriving Amaryllis
Light:
Amaryllis crave bright, indirect sunlight for optimal growth. Place them near a south-facing or east-facing window where they’ll receive ample light but avoid direct sunlight, which can scorch their leaves.
Water:
Water your amaryllis thoroughly when the soil surface feels dry to the touch. Avoid overwatering, which can lead to root rot. Adjust the watering frequency based on pot size, soil moisture, and the plant’s growth stage.
Fertilizer:
Feed your amaryllis with a balanced liquid fertilizer monthly during the growing season. Dilute the fertilizer according to the manufacturer’s instructions. Apply the fertilizer directly to the soil and avoid getting it on the leaves.
Temperature:
Amaryllis prefer warm temperatures between 65°F and 75°F (18°C and 24°C). Protect them from drafts and extreme temperatures.
Humidity:
Increase the humidity around your amaryllis by misting them regularly or placing them on a pebble tray filled with water. This is especially important during the winter months when the air tends to be drier.
Key Considerations for Healthy Development
Pot Size:
Choose a pot that is only slightly larger than the bulb itself. A too-large pot can hold excess moisture, increasing the risk of root rot.
Soil:
Use a well-draining potting mix specifically formulated for bulbs. A mixture of peat moss, perlite, and vermiculite provides optimal drainage and aeration.
Depth:
Plant the bulb with its neck above the soil line. The roots will develop below the bulb and the neck will support the flower stalk.
Maintenance Techniques for Optimal Growth
Cutting Back Flower Stalk:
Once the flowers have faded, cut back the spent flower stalk to approximately 1 inch (2.5 cm) above the bulb. This will prevent the plant from putting energy into seed production and promote new growth.
Establishing a Rest Period:
After flowering, allow your amaryllis to go into a rest period for 6-8 weeks. Place the plant in a cool, dark room and gradually reduce watering until the soil is completely dry.
Repotting:
Repot your amaryllis every 3-4 years or when it becomes rootbound. Choose a fresh potting mix and a slightly larger pot.
Troubleshooting Common Issues
Pests:
Aphids:
Aphids are tiny, wingless insects that feed on plant sap. They may cause yellowing, curling, and distortion of leaves. To control aphids, spray the plant with a strong stream of water or use an insecticidal soap.
With proper care and attention, you can enjoy the radiant beauty of amaryllis in your home. Remember to provide adequate light, water, fertilizer, temperature, and humidity. By following these tips and implementing the maintenance techniques outlined in this guide, you’ll create a thriving environment for your amaryllis to flourish and produce spectacular blooms.
Mealybugs: A Persistent Threat to Amaryllis Health
Mealybugs, tiny, white, cottony insects, are a common pest that can infest amaryllis plants. Their appearance is often mistaken for mold or cottony buildup, but a closer look will reveal their tiny bodies and crawling movement.
Signs of Infestation:
- White, cottony masses on stems, leaves, and crevices of the plant
- **Stunted growth*** and ***yellowing of leaves***
- Sticky, honeydew substance excreted by the bugs, which attracts ants and other pests
Eradication Methods:
- Manual Removal: Gently wipe off mealybugs using a cotton swab dipped in rubbing alcohol. Avoid crushing them to prevent spreading the infestation.
- Insecticidal Soap: Apply an insecticidal soap spray directly to the affected areas. Repeat the application every few days until the infestation is controlled.
- Neem Oil: Neem oil is a natural pesticide that can effectively repel and kill mealybugs. Mix 1 tablespoon of neem oil per gallon of water and spray it onto the plant.
- Systemic Insecticides: These insecticides are absorbed by the plant and distributed throughout its tissues, providing protection against pests. Follow the manufacturer’s instructions carefully when using these products.
Prevention Tips:
- Keep plants clean: Regularly inspect your amaryllis for signs of mealybugs and remove any debris or dead leaves that could attract them.
- Isolate infested plants: If you find an infested plant, isolate it immediately to prevent the spread of mealybugs to other plants.
- Use sticky traps: Place yellow sticky traps near your amaryllis to monitor for and capture pests.
By following these steps, you can effectively control and eradicate mealybugs, ensuring the health and beauty of your amaryllis plants.
Diseases Affecting Amaryllis
Amaryllis, with its captivating blooms, can fall victim to various diseases that threaten its health. It’s crucial to understand these ailments to protect your prized plants.
Fungal Diseases
Fungal diseases pose a significant threat to amaryllis. These include:
- Basal rot: Caused by the Fusarium fungus, basal rot affects the bulb’s base, turning it mushy and brown.
- Leaf spot: This fungal disease causes circular or elongated spots on leaves, which can turn brown or black.
- Rust: Rust fungi infest leaves, stems, and flowers, causing powdery, orange-brown pustules.
Treatment:
Fungicides are the most effective treatment for fungal diseases. Apply them according to the manufacturer’s instructions. Remove and discard infected plant parts to prevent further spread.
Narcissus Bulb Fly
The narcissus bulb fly (Merodon equestris) is a parasitic insect that can infest amaryllis bulbs.
Life cycle:
– Adult flies lay eggs in the soil near amaryllis bulbs.
– Larvae hatch and burrow into bulbs, feeding on their contents.
– Infested bulbs rot and produce maggots that emerge as adult flies.
Damage:
Narcissus bulb fly larvae cause bulbs to become soft and spongy, ultimately killing the plant.
Control measures:
– Regularly inspect amaryllis bulbs for any signs of infestation.
– Remove and destroy infested bulbs immediately.
– Apply insecticides to control adult flies.
– Practice crop rotation to break the pest’s life cycle.
By understanding and addressing these diseases, you can ensure the health and longevity of your amaryllis plants, allowing them to showcase their vibrant blooms for years to come.
Combatting Fungal Foes: Amaryllis Disease Management
Fungal diseases pose a significant threat to amaryllis, marring their beauty and potentially leading to plant death. Understanding the symptoms and adopting timely treatment measures is crucial for safeguarding these beloved blooms.
Red Blotch Disease:
Red blotch disease, caused by the fungus Stagonospora curtisii, manifests as reddish-brown blotches on amaryllis leaves. As the disease progresses, the blotches enlarge, causing leaves to wilt and die. Promptly remove and discard affected leaves to prevent spore dispersal. Applying a fungicide containing thiophanate-methyl or chlorothalonil can effectively combat the infection.
Botrytis Blight:
Botrytis blight, caused by the fungus Botrytis cinerea, thrives in humid conditions. It typically attacks amaryllis blooms, causing them to turn grayish-brown and develop a watery texture. Infected blooms should be immediately removed and destroyed to avoid spreading the disease. Maintaining good air circulation and avoiding overhead watering can help prevent botrytis blight. Fungicides containing iprodione or myclobutanil can also be used to control the infection.
Fusarium Wilt:
Fusarium wilt, caused by the fungus Fusarium oxysporum, is a vascular disease that affects amaryllis roots. Infected plants exhibit yellowing and wilting of leaves, starting from the bottom of the plant. As the disease progresses, the entire plant may collapse and die. There is no cure for fusarium wilt, so it is essential to prevent infection by planting healthy bulbs in well-drained soil. Avoid overwatering and keep the planting area free of plant debris.
Early Detection and Intervention:
Early detection and prompt treatment are essential for managing fungal diseases in amaryllis. Regularly inspect your plants for any signs of infection. If you suspect a fungal problem, isolate the affected plant to prevent spread. Consult with a gardening expert or research online for appropriate treatment options. By taking preventative measures and implementing timely interventions, you can safeguard your amaryllis collection from these common fungal threats.
Growing Thriving Amaryllis: A Comprehensive Guide for Beautiful Blooms
1. Essential Elements for Thriving Amaryllis
- Light: Amaryllis thrive in bright, indirect light. Place them in a south- or east-facing window where they can receive 6-8 hours of sunlight daily.
- Water: Water the plants thoroughly when the top 2 inches of soil feel dry to the touch. Avoid overwatering, as this can lead to root rot.
- Fertilizer: Fertilize the plants monthly during the growing season with a balanced fertilizer diluted to half strength.
- Temperature: Amaryllis prefer warm temperatures. Maintain a consistent temperature between 60-80°F (16-27°C).
- Humidity: Amaryllis appreciate higher humidity levels. Use a humidifier or place a pebble tray filled with water under the pot to increase humidity.
2. Key Considerations for Healthy Development
- Pot Size: Choose a pot that is 2-4 inches wider than the bulb. Ensure it has drainage holes to prevent waterlogging.
- Soil: Use a well-draining potting mix that is high in organic matter. Amend with compost or peat moss.
- Depth: Plant the bulb with its neck just above the soil surface.
3. Maintenance Techniques for Optimal Growth
- Cutting Back Flower Stalk: After flowering, remove the spent flower stalk to prevent it from draining energy from the bulb.
- Establishing a Rest Period: Allow the plant to go dormant after flowering. Stop watering and keep the pot in a cool, dark place for 8-12 weeks.
- Repotting: Repot the plant every 2-3 years or when the bulb becomes crowded. Use a fresh potting mix and a slightly larger pot.
4. Troubleshooting Common Issues
Pests:
- Aphids: These tiny insects feed on plant sap, causing leaves to yellow and wilt. Control with insecticidal soap or neem oil.
- Mealybugs: These white, fluffy insects can infest leaves and stems. Remove them by wiping with a cotton ball dipped in rubbing alcohol.
Diseases:
- Fungal diseases: These diseases can cause leaf spots, wilting, and rot. Treat with fungicides or remove infected plants.
- Narcissus bulb fly: This fly lays eggs on the bulbs, which hatch into maggots that feed on the plant’s interior. Control by removing and destroying infested bulbs and using insecticides to kill the flies.
